


2 Installing the MDW 9031/9031DCP Pocket Phone Battery Charger
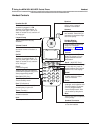
MDW 9031/9031DCP Wireless Pocket Phone Installation and Use
503-801-16664 Issue 3 October 1999
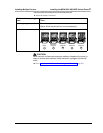
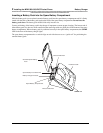
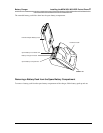
Battery Charger
This section explains how to choose a location for the battery charger and install it. It also explains how to insert
and remove a battery pack.
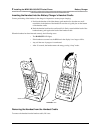
Positioning the Battery Charger
The battery charger can be placed on a desk, or it can be mounted on a wall. Before you install the battery
charger, note the following considerations:
• Locate the battery charger within 5 feet (1.6 m) of a properly grounded, 3-prong
electrical outlet that is not controlled by an on/off switch.
• If your communications system uses an uninterruptible power supply, such as a
backup generator, you may want to connect the battery charger to that power
supply.
• Do not locate the battery charger where it will be exposed to direct sunlight or
water.
WARNING:
!
The rechargeable battery pack may contain elements that are harmful to
the environment (for example, nickel). Do not burn or puncture the
battery. As with other batteries of this type, burning or puncturing could
release toxic material that could cause injury. Do not dispose of it in
household garbage. For information about recycling or proper disposal,
consult your local solid waste (garbage) collection or disposal
organization.
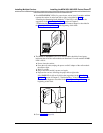
Installing the Battery Charger
• If you are wall-mounting the battery charger, follow Steps 1 through 7.
• If you are desk-mounting the battery charger, follow only Steps 1, 5, and 7.
To install the battery charger:
1 Check to make sure the battery charger’s power cord is unplugged from the wall
outlet before continuing. If you are desk-mounting, skip to Step 5.
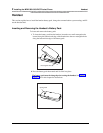
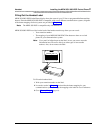
2 To wall-mount, place the battery charger’s wall-mounting template (located on
the last page of this book) against the wall. Choose a location backed by a
wooden stud (if unavailable, use toggle bolts instead of the supplied wood
screws). Hold the template straight; use a level if needed.
3 Mark the locations for the two wall-mounting screws, and then remove the
template from the wall. Lightly tap a nail into the wall to start the holes.
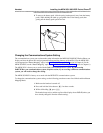
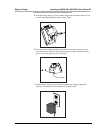
4 Place the screw through the wall spacers so that the screw head nests in the
indentation on the spacer. Start the screws, and screw them in until the wall
spacers rest against the wall.