


Vmux-2100 Installation and Operation Manual Chapter 4 Management from a Terminal
Entering Main Link and Voice Modules into the Database 4-17
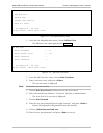
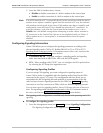
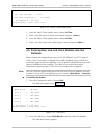
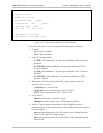
Date & Time Update
1. Set Time (hh:mm)... (13:23)
2. Set Date (dd/mm/yyyy)... (4/2/2002)
@ - Db Update; # - Db Undo
ESC-prev.menu; !-main menu; &-exit
Figure 4-19. Date & Time Update Menu
2. From the Date & Time Update menu, choose Set Time.
3. Enter a new time value in the hh:mm format, and press <Enter>.
4. From the Date & Time Update menu, choose Set Date.
5. Enter a new date value in the dd/mm/yyyy format, and press <Enter>.
4.6 Entering Main Link and Voice Modules into the
Database
Before starting the configuration process of the 10/100BaseT and E1/T1 ports of
Vmux-2100, it is necessary to identify the modules installed in your system and
enter their types into the unit database. You can perform identification prior to the
physical installation of the modules. This allows you to reduce the system
downtime by preparing Vmux-2100 for a new configuration or upgrade.
You can check the number and types of the main link and voice modules currently
installed in Vmux-2100 by displaying the unit’s inventory (Main Menu > Inventory).
To identify the modules:
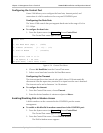
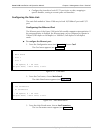
1. From the Configuration menu, choose Hub.
The Hub menu appears (see Figure 4-20).
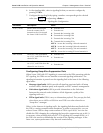
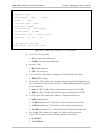
Hub
1. Main Board > (M-IPE1)
2. Slot 1 > (NO CARD)
3. Slot 2 > (NO CARD)
4. Slot 3 > (NO CARD)
5. Slot 4 > (NO CARD)
@ - Db Update; # - Db Undo
ESC-prev.menu; !-main menu; &-exit
Figure 4-20. Hub Menu
2. From the Hub menu, choose Main Board to select the main link module.
The Main Board menu appears.
Note