


Vmux-2100 Installation and Operation Manual Chapter 2 Installation and Setup
AM Installation and Setup 2-5
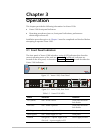
Connecting the Power
Vmux-2100 includes two hot-swappable AC or DC power supplies, supporting
load sharing. To connect Vmux-2100 to the power source, refer to the appropriate
section below, depending on your version of the unit (AC or DC).
Before switching on this unit and connecting or disconnecting any other cable,
the protective earth terminals of this unit must be connected to the protective
ground conductor of the mains (AC or DC) power cord. If you are using an
extension cord (power cable) make sure it is grounded as well.
Any interruption of the protective (grounding) conductor (inside or outside the
instrument) or disconnecting of the protective earth terminal can make this
unit dangerous. Intentional interruption is prohibited.
The line fuse is located in an integral-type fuse holder located on the rear
panel. Make sure that only fuses of the required rating, as marked on the rear
panel, are used for replacement. Do not use repaired fuses or short-circuit the
fuse holder. Always disconnect the mains cable before removing or replacing
the fuse. Whenever it is likely that the fuse protection has been damaged,
make the unit inoperative and secure it against unintended operation.
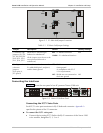
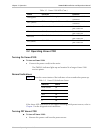
Connecting AC Power
AC power is supplied to Vmux-2100 through a standard 3-prong plug with an
integral fuse holder (see Figure 2-2).
AC power should be supplied through the 5 ft (1.5m) standard power cable
terminated by a standard 3-prong plug. The cable is provided with the unit.
To connect AC power:
1. Connect the power cable(s) to the power connector(s) on the Vmux-2100 rear
panel.
2. Connect the power cable to the mains outlet.
The unit will be turned on automatically upon connection to the mains.
Connecting DC Power
To connect DC power:
• Refer to DC Power Supply Connection Supplement.
Warning