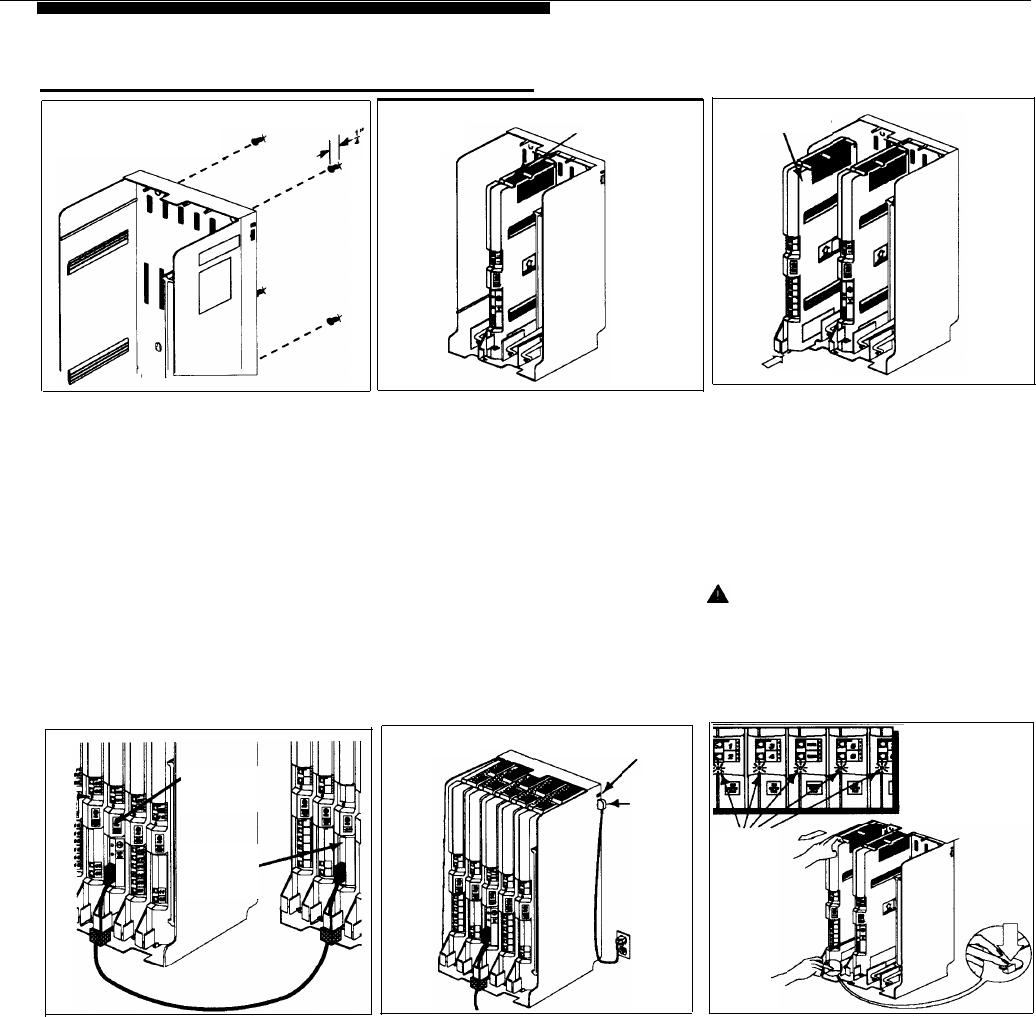
Installing the Carriers and Modules
206 Module
Backplane
1
A) Hold the backplane against the
2
3
wall. (If you are also installing the
expansion carrier, plan to install it to
the right of the primary carrier, leaving
6” to 24” between carriers.) Using the
four screw keyholes in the backplane
as a template, mark screw locations
on the wall. Start four #12 screws,
leaving the screw heads approxi-
mately 1/4” away from the wall. Slip
the backplane onto the screws and
tighten them. B) If you are mounting
the expansion carrier, repeat this step.
Primary
Processor
Module
Expansion
Processor
Module
Power
Jack
Lights
4
If you have installed both carriers,
plug the ends of the expansion cable
into the two processor modules and
tighten the screws. Route both ends
of the cable through the hooks on the
fronts of the modules.
NOTE: The colored plastic filters on
the expansion cable should rest just
below the hooks.
Primary
Processor
Module
A) Slide the primary processor mod-
ule into the center slot of the primary
carrier backplane. Push slowly but
firmly until the module locks into place
with two snaps, so that it is attached to
the rear of the backplane and held by
the locking tab on the bottom of the
slot. Do not force the module. If it
does not insert easily, remove the mod-
ule, clear any obstruction, and rein-
sert. B) If you have an expansion
carrier, slide the expansion processor
module into its center slot until the
module locks into place.
Main Circuit Breaker
5
A) Make sure the main circuit
breakers on both carriers are off
(pulled out). B) Press the AC power
cord firmly into the power jack on the
top right rear of the backplane until it
locks into place. Plug the other end of
the power cord into a grounded
three-prong wall outlet not controlled
by a switch. Repeat for the expansion
carrier, plugging its cord into the same
wall outlet. C) Push in the main circuit
breaker for the expansion carrier first,
and then push in the main circuit
breaker on the primary carrier.
Slide the first 206 module into the
leftmost slot of the primary carrier
backplane. (The system will not work if
a 206 module is not installed in this
slot.) Going from left to right, install a
206 module first, then a 400 module.
Each 400 module must be to the right of
a 206 module.
WARNING:
There are no customer-serviceable
components inside the modules or
backplane. Hazardous voltages
within. DO NOT OPEN THE
MODULES!
6
Check all green lights on the fronts
of the modules to make sure they are
lit. If a single light is out, pull out the
main circuit breakers, reseat the
module, then push in the main circuit
breakers (as you did in Step 5C). If
multiple lights are out, check to see
that the modules are installed in the
right order. If they are, pull out the
main circuit breakers, reseat the
leftmost module of the ones that were
out, then push in the main circuit
breakers. If the lights are still out, call
the Helpline.
Installing the Hardware
2-9
