


Directory Number Administration –––––––––––––––––––––––––––––––––––––––––––––––––––––––––––––––––––
88
DKAdmin/DKBackup
➤ To set/change CO Line flexible key assignments
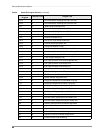
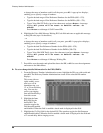
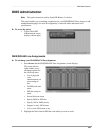
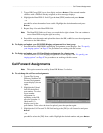
1. From the Directory
Number for Primary
DN XXX screen,
highlight a [DN] and
press F5. The Flexible
Key Assignments
screen for the selected
Port/DN displays
(shown right).
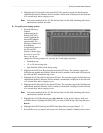
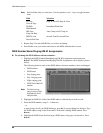
2. Highlight the desired
Flexible Key
Assignment and:
♦ Press F2 to change
the assignment from a CO line to the PDN.
♦ Press F3 to change the assignment to the SDN. A pop-up dialog box displays. Type
the [PDN]/[SDN] (0000 ~ 9999) you wish to assign and press Enter.
♦ Press F4 to change the assignment to a PhDN. A pop-up dialog box displays. Type the
[PhDN] (0000 ~ 9999) you wish to assign and press Enter.
♦ Press F5 to deactivate or blank out a key assignment.
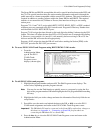
♦ Press F6 to display a pop-up dialog box showing the available key assignments.
Highlight the desired assignment and press Enter.
♦ Press F8 to add multiple speed dial key assignments.
Important! You can only use this key when you are assigning more than one speed dial key at
a time. If you have not just added a speed dial key assignment, the message Must
Assign System/Station Speed Dial First displays.
If you leave the cursor in the same field and continue to press F8, the speed dial
key number increments. To add consecutive speed dial key assignments, you must
continue to highlight the next field before pressing F8.
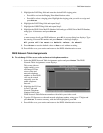
3. Press F10 to save the entries and return to the Directory Number Administration (detail)
screen.
4. Press F10 to save your programs and return to the main Directory Number Administration
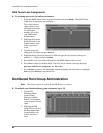
screen.
5. Press F9 to save the entries and upload the data to the Strata DK, or F10 to save the
assignments and return to the Main Menu.