


Upgrade ––––––––––––––––––––––––––––––––––––––––––––––––––––––––––––––––––––––––––––––––––––––
110
DKAdmin/DKBackup
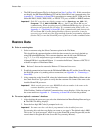
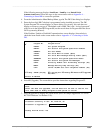
8. Press Enter and then select the processor type you are upgrading to; press Enter after
selecting the processor (RDTU E/F, Release 3 in this example).
9. If you haven’t backed up the customer database by downloading the original RCTU,
answer Yes to Backup From DK First; otherwise, answer No. Press the spacebar to
make your selection and then press Enter.
10. From the screen in Step 7 above, use the spacebar to change Backup From DK First
from No to Yes to download the database from the original processor and press Enter.
Note If you already completed a backup and have a spare customer database for the original
processor, you can answer No to the prompt: Backup from DK First.
DKAdmin/DKBackup upgrades the database files and displays the screen shown in
Step 13. Steps 11 and 12 are skipped.
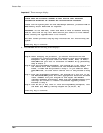
You are prompted with the message Upgrading to DK RCTU EF, R3. Are you
sure? This database is then upgraded before sending it to the “new” processor
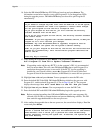
11. Use the arrow keys to highlight Yes and press Enter. You are now prompted with You
will receive data FROM the DK. Are you sure?
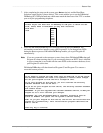
12. Highlight Yes and press Enter. DKAdmin/DKBackup downloads the following files:
PRGALL, REPALL, NAMEALL, VIDALL, ADMEMOAL, MSGALL, CFALL
(Release 3), MWALL (Release 3), CLID (Release 3). DKAdmin/DKBackup then
upgrades and builds the database. After upgrading the database, the screen in Step 13
displays.
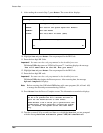
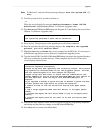
13. At this point DKAdmin/DKBackup has upgraded the customer database; follow the
instructions on the screens below to change ROMs/Flash Memory on processors and add
cabinets and PCBs as required.
Important! Remember to turn power off before changing PCBs and cabinets. Then turn the
system back on and perform the steps on the screen below to ensure the
DKBackup and DK system TTY port communication link continues to function
during the remaining upgrade process.
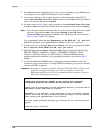
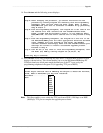
Processor Conversion
PLEASE READ THE FOLLOWING SCREENS AS THEY PROVIDE VERY IMPORTANT
INFORMATION REGARDING THE UPGRADE AND INITIALIZATION PROCESSES.
Please turn DK system power off and add/change cabinets, processor ROM or
RMSS memory and/or RCTU PCBs as required.
IMPORTANT: Do not add PCBs, other than RSIU or PIOU in between existing
PCBs at this time as they will make station port and/or CO line numbers
shift causing the upgraded data to be invalid.
The next screen provides step-by-step instructions for initializing the
system.
Press any key to Continue