


–––––––––––––––––––––––––––––––––––––––––––––––––––––––––––––– Flexible Button Programming Section
67
Administration Menu (DKAdmin)
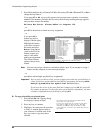
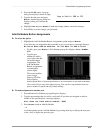
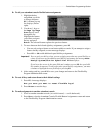
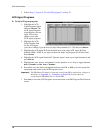
➤ To edit your attendant console flexible button assignments
1. Highlight the key
assignment you wish
to change and press
F6. A feature pop-up
list displays (shown
right).
2. Use the +/- keys or
the Page Up/Page
Down keys to scroll
through the list.
Highlight the feature
you want to assign to
the key and press
Enter. The selected feature replaces the previous feature.
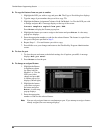
3. To move between the left and right key assignments, press F2.
♦ You can only assign a feature to one button within a console. If you attempt to assign a
feature already assigned, an error message displays.
♦ Press F8–+ SD to add additional speed dial key assignments.
Important! You can only use this key when you are assigning more than one speed dial key at
a time. If you have not just added a speed dial key assignment, the message Must
Assign System/Station Speed Dial First displays.
If you leave the cursor in the same field and continue to press F8, the speed dial
key number increments. To add consecutive speed dial key assignments, you must
continue to highlight the next field before pressing F8.
4. After setting each key, press F10 to save your changes and return to the Flexible Key
Program Administration screen.
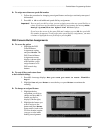
➤ To reset all keys and return them to their default settings
1. Press F5. A message displays:
Are you sure you want to reset flexible keys?
2. Press Enter to reset the keys.
➤ To make assignments to another attendant console
1. Scroll to another attendant console (+ scrolls forward, - scrolls backward).
2. Press Esc to close the Attendant Console Flexible Button Assignments screen and return
to the Flexible Key Program Administration screen.