


Configuring Communication
55
NXD-700Vi 7" Modero® Wall/Flush Mount Touch Panel with Intercom
3. Click the Communications Settings button to open the Communications Settings dialog.
4. Click the NetLinx Master radio button (from the Platform Selection section).
5. Click the Virtual Master radio button (from the Transport Connection Option section).
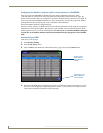
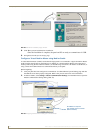
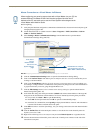
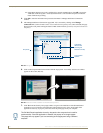
6. Click the Edit Settings button to open the Virtual NetLinx Master Settings dialog (FIG. 39).
7. Enter the System number (default is 1).
8. Click OK to close all open dialogs and save your settings.
9. Click the OnLine Tree tab in the Workspace window to view the devices on the Virtual System.
10. Right-click on Empty Device Tree/System and select Refresh System to re-populate the list.
The panel will not appear as a device below the virtual system number (in the Online Tree tab) until
both the system number (default = 1) is entered into the Master Connection section of the System
Settings page and the panel is restarted.
The Connection status turns green after a few seconds to indicate an active USB connection to the
PC (Virtual Master).
If the System Connection icon does not turn green, check the USP connection and communication
settings and refresh the system.
Ethernet
1.
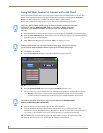
When using Ethernet, press the listed Mode to toggle through the available connection modes:
2. Select the Master Port Number to open the keypad and change this value. The default setting for the port
is 1319.
3. Set your Master Port and select Done.
If you have enabled password security on your master you need to set the username and password within the
device.
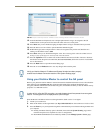
4. Select the blank field Username to open the keyboard.
5. Set your Username and select Done.
6. Select the blank field Password to open the keyboard.
7. Set your Password and select Done.
8. Press the Back button to return to the Protected Setup page.
9. Press the Reboot button to reboot device and confirm changes.
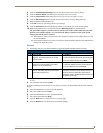
Connection Modes
Mode Description Procedures
Auto The device connects to the first master that
responds. This setting requires you set the
System Number.
Setting the System Number:
1. Select the System Number to open the keypad.
2. Set your System Number select Done.
URL The device connects to the specific IP of a
master via a TCP connection. This setting
requires you set the Master’s IP.
Setting the Master IP:
1. Select the Master IP number to the keyboard.
2. Set your Master IP and select Done.
Listen The device "listens" for the master to initiate
contact. This setting requires you provide the
master with the device’s IP.
Confirm device IP is on the Master URL list. You
can set the Host Name on the device and use it to
locate the device on the master. Host Name is
particularly useful in the DHCP scenario where the
IP address can change.