


Appendix B - Wireless Technology
203
NXD-700Vi 7" Modero® Wall/Flush Mount Touch Panel with Intercom
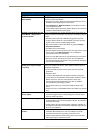
AMX Certificate Upload Utility
The Certificate Upload utility gives you the ability to compile a list of target touch panels, select a pre-obtained
certificate (uniquely identifying the panel), and then upload that file to the selected panel.
This application ensures that a unique certificate is securely uploaded to a specific touch panel. Currently, the
target panels must be capable of supporting the WPA-PSK and EAP-XXX wireless security formats.
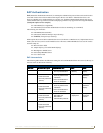
The Certificate Upload utility supports the following capabilities:
Ability to browse both a local and network drive to find a desired certificate file.
Ability to create a list of target AMX G4 touch panels based on IP Addresses
- Compatible panels include: MVP-8400, MVP-7500, NXD-CV10, NXT-CV10,
NXD-CV7, NXT-CV7, NXD-700Vi, and NXD-1000Vi.
Ability to display the IP Address of the local computer hosting the application.
Ability to load a previously created list of target touch panels.
Ability to save the current list of target Modero panel as a file.
Ability to track the progress of the certificate upload by noting the current data size being
transmitted and any associated error messages (if any).
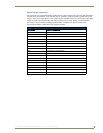
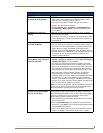
The Certificate Upload Utility recognizes the following certificate file types:
CER (Certificate File)
DER (Distinguished Encoding Rules)
PEM (Privacy Enhanced Mail)
PFX (Normal Windows generated certificate)
PVK (Private Key file)
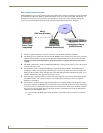
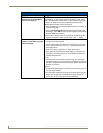
Configuring your G4 Touch Panel for USB Communication
For a personal computer to establish a connection to a Modero panel via USB, the target computer must have
the appropriate AMX USB driver installed. This installation is bundled into the latest TPDesign4 and NetLinx
Studio2 software setup process or can be downloaded independently from the main Application Files page on
www.amx.com.
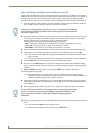
Step 1: Setup the Panel and PC for USB Communication
1.
If you do not currently have the latest version of TPDesign4, navigate to www.amx.com > Tech Center >
Downloadable Files > Application Files > NetLinx Design Tools section of the website and locate the
AMX USB Driver executable (AMX USBLAN Setup exe).
2. Download this executable file to a known location on your computer.
3. Launch the Setup.exe and follow the on-screen prompts to complete the installation.
This application must be run from a local machine and should not be used from a
remote network location.
Close the Certificate Upload Utility before configuring the touch panel's USB driver.
Only after the panel has been successfully setup to communicate via USB can you
then re-launch the utility.