


Installation
25
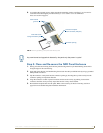
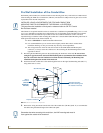
NXD-700Vi 7" Modero® Wall/Flush Mount Touch Panel with Intercom
Installation
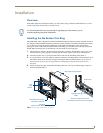
Overview
NXD-700Vi panels are installed into either a pre-wall surface (using a CB-TP7 conduit/wallbox) or a solid
surface (using either solid surface or drywall screws).
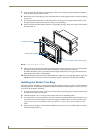
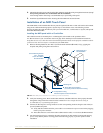
Installing the No-Button Trim Ring
The NXD-700Vi panel is shipped from AMX with the default Button Trim Ring already installed. The unit is
also shipped with an included Trim Ring containing no button openings (a No-Button Trim Ring) that allows
you, if desired, to change the default configuration of the NXD panel Faceplate to that with no-button
openings. In order to install this included No-Button Trim Ring, you must first remove the factory-installed
default Button Trim Ring, the six small buttons, and associated two clear light pipes.
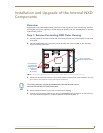
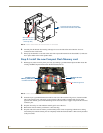
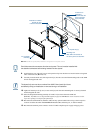
1. The Faceplate is secured to the panel with plastic latches. To remove the Faceplate, simply pull it away
from the panel by gently tugging it outwards until the entire Faceplate comes away from the panel.
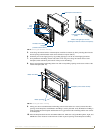
2. Turn the Faceplate over to expose the inside surface and view the Trim Ring latches (FIG. 7).
3. In a single motion, press down and then outwards on the three Trim Ring latches located along the top of
the internal surface of the Faceplate to begin removing the Button Trim Ring. Removing the Internal
Faceplate from the panel exposes the pushbuttons and light pipes along the inside of the Internal
Faceplate.
4. Gently tug along the edges of the Button Trim Ring and work your way around the edges to remove it
from the Faceplate (FIG. 7).
It is recommended that if you are planning on upgrading your flash memory, you do
so before beginning any panel installations.
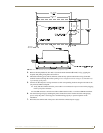
FIG. 7 Removing the default Button Trim Ring
Default Button Trim Ring
Trim
(with button openings)
B
Faceplate
NXD-700Vi Panel/enclosure
Ring
Latches
Button latch
Light Pipe latch
(black)
Button and Light Pipe removal
(showing the internal surface of Faceplate)
(outside surface shown)