


Installation and Upgrade of the Internal NXD Components
21
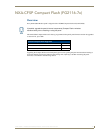
NXD-700Vi 7" Modero® Wall/Flush Mount Touch Panel with Intercom
Installation and Upgrade of the Internal NXD
Components
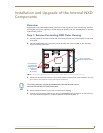
Overview
Upgrading the cards within the Wall Mount panel involves removing the rear plastic outer housing (back box),
removing the existing card, replacing it, and then placing the back box back onto the NXD panel, as described
in the following sections.
Step 1: Remove the existing NXD Outer Housing
1. Carefully detach all connectors from the side of the touch panel and remove the Faceplate from the front
of the panel.
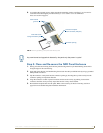
2. Place the LCD facedown on a soft cloth to expose the under-side of the unit (FIG. 3). This step helps
prevent scratching of the LCD.
3. Firmly press down on both connector overlay release latches (located in front of the connectors). Pressing
down releases the connector overlay from atop the connectors.
4. Gently slide the connector overlay away from the back box housing.
5. Unscrew the outer housing (back box) by using a grounded Phillips-head screwdriver to remove the two
sets of pan-head Housing Screws, located on both sides of the housing (FIG. 3).
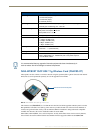
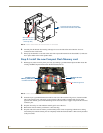
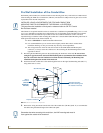
FIG. 3 Location of the attachment screws and connector overlay release latches on an NXD back box
Unscrew these
four pan-head
Two (2) connector
housing screws
to remove the
back box
overlay release latches
(2 per side)
The overlay connector must first be released before the rear back box can be
removed from the NXD-CV7/NXD-700Vi panel.