


Installation and Upgrade of the Internal NXD Components
22
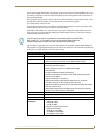
NXD-700Vi 7" Modero® Wall/Flush Mount Touch Panel with Intercom
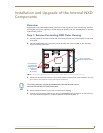
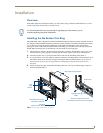
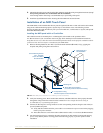
6. Carefully lift-off the back box housing and angle it over to the side of the unit where the wires are
connected to the circuit board.
7. Gently lay the back box to one side of the unit. This exposes the internal circuit board (FIG. 4). Take care
not to place undue strain on the speaker cables.
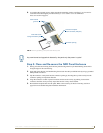
Step 2: Install the new Compact Flash Memory card
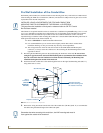
1. Discharge any static electricity from your body by touching a grounded metal object and then locate the
existing 128 MB Compact Flash card on the main board (FIG. 5).
2. Insert the tip of a grounded flat-head screwdriver into one of the card removal grooves (located on either
side of the existing card), and gently pry the card out of the slot (FIG. 6). Repeat this process on the
opposite card removal groove. This alternating action causes the card to "wiggle" away from the on-board
connector pins.
3. Grip the old card by its sides and then carefully pull it out of the slot.
4. Remove the new CF memory card from it’s anti-static bag.
5. Grip the sides of the new CF memory card and firmly insert it into slot opening (with the arrow facing
towards the pins) until the contact pins are completely inside the flash card and it is then securely attached
to the pin sockets.
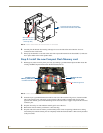
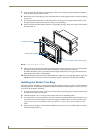
FIG. 4 Location of the wireless CF card connector on main board
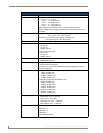
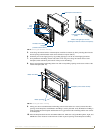
FIG. 5 Location and orientation of the card slots
Wireless CF card
(Slot #2 is located
on the top slot)
Connector Overlay must first be
removed from the side of the NXD
Compact Flash
Memory Card (Slot 1)
Wireless CF Card
(Slot 2)
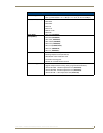
Card removal grooves
Card Removal Grooves