


Configuring Communication
53
NXD-700Vi 7" Modero® Wall/Flush Mount Touch Panel with Intercom
Prepare your PC for USB communication with the panel
If you haven’t already done so, download and install the latest versions of NetLinx Studio2 and TPDesign4
(from www.amx.com), and restart your PC.
Configure the panel for USB communication
The first time the panel is connected to the PC it is detected as a new USB hardware device, and the correct
(panel-specific) USBLAN driver must be associated to it manually. Each time thereafter, the panel is
recognized as a unique USBLAN device, and the association to the driver is handled automatically.
1. Connect the PS4.4 power connector to the panel (or docking station if the panel is already installed) to
supply power.
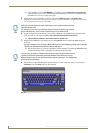
2. Press and hold the two lower external pushbuttons on either side of the panel simultaneously for 3
seconds to access the Setup page.
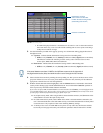
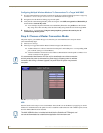
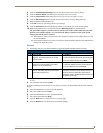
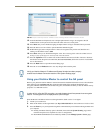
3. In the Protected Settings page, select System Settings to open the System Settings page (FIG. 37).
4. Toggle the blue Type field (from the Master Connection section) until the choice cycles to USB.
Refer to the System Settings Page section on page 86 for information about the fields on this page.
5. Press the Back button to return to the Protected Setup page.
6. Press Reboot to save changes and restart the panel.
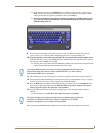
7. When the panel powers up and displays the first panel page, insert the mini-USB connector into the
Program Port on the panel.
It may take a minute for the panel to detect the new connection and send a signal to the PC
(indicated by a green System Connection icon).
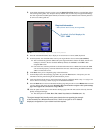
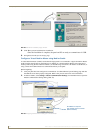
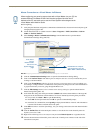
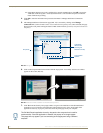
The first time the panel is recognized by the PC as a new USB device, a USB driver installation
popup window (FIG. 38) is displayed. This window notifies you that the panel has been detected as
a USB device, and the appropriate USB driver is being installed to establish communication with
the panel. It also indicates that the AMX USBLAN driver does not contain a Microsoft
®
digital
signature.
FIG. 37 System Settings page - USB Connection