


Installation MT8850A / MT8852A Bluetooth Test Set
13000-000109 3-7
June 2003 Rack Mounting
Tools Required
1 Small Phillips screwdriver
1 Large Phillips screwdriver
1 Small Phillips torque screwdriver 10cNm to 120cNm.
1 Foot removal tool 50210 (supplied).
1 Assembly drawing “ML2400/03 SIDE BY SIDE OPTION”
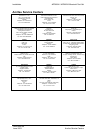
Assembly Procedure for fitting a ML2430A to another ML2430A
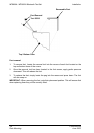
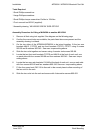
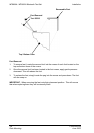
1. Remove all feet using tool supplied. See diagram on the following page.
2. Confirm the correct tools are available, the parts listed above are present and the
assembly drawing is at hand.
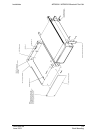
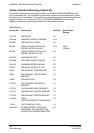
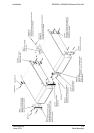
3. On the two sides of the MT8850A/MT8852A to be joined together, fit the two rear
brackets 49413, C37279, and two front brackets C37275, C37277 using 8 screws
905-68 and 8 washers 900-345. See max. torque setting above.
4. Slide the two units together and secure using 4 counter sink screws 905-69.
5. Locate the two front rack brackets C37276 and 49415 at the front of each unit, one
on each side with four screws 905-68 and four washers 900-345. See max. torque
setting above.
6. Locate the two rear rack brackets C41449 at the back of each unit, one on each side
with four screws 905-68 and four washers 900-345. See max. torque setting above.
7. Fit the four speed nuts 790-319 to the rack in the correct place to allow mounting of
the two units in the rack.
8. Slide the two units into the rack and secure with 4 decorative screws 900-821.