


Installation MT8850A / MT8852A Bluetooth Test Set
13000-000109 3-3
June 2003 Rack Mounting
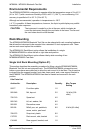
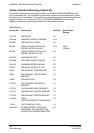
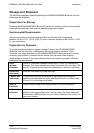
Kits Parts List
mount
D41473 Rack mount, support bracket 1.0
49361 Bracket support, base panel 1.0
MT8852A MT8850A/MT8852A fitted with
universal top and bottom covers
with removable feet.
1.0
Tools Required
1 Small Phillips screwdriver
1 Large Phillips screwdriver
1 Small Phillips torque screwdriver 0 cNm to 50 cNm.
1 Torque socket driver 0 cNm to 200 cNm.
1-Foot removal tool (supplied).
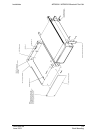
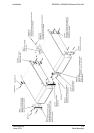
1 Assembly drawing “MT8852A/01 Rack Mounted left or right option”
Assembly Procedure
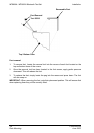
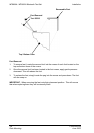
1. Remove all feet from the MT8850A/MT8852A using the tools supplied. See diagram
and notes on the following pages.
2. Confirm the correct tools are available, the parts listed above are present and the
assembly drawing is at hand.
3. Lay the large support bracket D41473 next to the MT8850A/MT8852A Bluetooth Test
Set as per the assembly drawing. Note if the instrument needs to be mounted on the
left side of the rack, simply lay the bracket on the right side. i.e. a mirror image of the
assembly drawing.
4. Locate the support bracket on to the four case pillars. Secure with 4 screws 905-68
and 4 washers 900-345. See max. torque setting above. Note leave the two rear
screws lose to allow alignment, location, and securing of the 6 base plate snap rivets
788-575.
5. Locate the front rack mounting bracket C37276 at the front of the instrument on the
other side to the large support bracket with two screws 905-68 and two washers 900-
345. See max. torque setting above.
6. Locate the rear rack bracket C41449 at the back of the instrument on the other side
to the large support bracket with two screws 905-68 and two washers 900-345. See
max. torque setting above.
7. Fit the front face plate 50077 with 2 kep nuts 900-848. See max. torque setting
above.
8. Position the base panel 49361 as shown in the drawing, and secure with 6 snap
rivets 788-575.
9. Fit the four speed nut 790-319 to the rack in the correct place to allow mounting of
the instrument in the rack.
10. Slide the instrument into the rack and secure with 4 decorative screws 900-821.