


34 - 165 IP Telephony v1.0 Lab 3.1.1 Copyright © 2005, Cisco Systems, Inc.
o. Refer to the Table 2 IP Telephony Dial Plan (back of lab manual) to find the appropriate first
extension number. Use the first column in the table to locate the pod being used. The second
column lists extension numbers. From the second column pick the first number in the range
listed for the pod being used. For example, if Pod 1 is being used then the first extension number
is 5000.
p. When asked if DID (Direct-Inward-Dialing) is used, answer y, and press Enter.
DID is a local phone company service that provides a block of phone numbers used to call into a
company's PBX system. With DID, individual phone numbers can be assigned to each person or
PC without having to have a physical line into the PBX for each person’s connection.
q. When asked for the full E.164 number, enter the value from IP Telephony Table 2 that is specific
for the pod. For example, if Pod 1 was being used the E.164 DID number would be 5105555000.
A fully qualified E.164 number contains a country code (issued by the ITU), area code
(sometimes known as a STD code), and the local telephone number. Since the country has been
selected already, it is just the area code and the phone number.
What E.164 number is being used on this router? ____________________________________
r. When asked if forwarding to voicemail (voice message service) is desired, enter y, and press
Enter.
s. Enter the extension number for voicemail based on the pod number assigned. The extension
numbers for voicemail can be seen in the IP Telephone Table 2.
What voicemail extension is being used? _________________________________________
t. Press the Enter key to accept the default of 18 seconds for Call Forward timeout.
u. When asked if any of the information is to be changed, select yes to change an option, or no to
use the current settings and to exit out of the utility. If no mistakes were made in the previous
steps enter n, press Enter, and proceed to the Step1v. If any mistakes were made enter y, press
Enter, and go back to Step 1c.
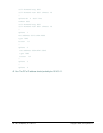
v. Watch the console output to see if the phones register. Output similar to the following should be
seen on the terminal window. Note that this may take several minutes.
Mar 2 23:57:09.080: %IPPHONE-6-REGISTER: ephone-1 :SEP000F2470F92E
IP:10.15.0.11 Socket:1 DeviceType:Phone has registered.
Note: The power to the phone may need to be removed and reapplied in order to get the phone
to re-request an IP address and register with Call Manager Express.
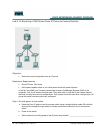
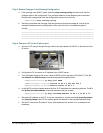
Step 2 Confirm Correct Setup of CME
a. Place a call between the two IP phones. Pick up the handset on one phone and enter the
number of the second IP phone. Once a connection has been made, reverse the process. Make
a call from the second IP phone to the first one. Calls can also be placed by entering the number
of the other IP phone and pressing the speaker button on the bottom right of the phone. Note
that the speaker button could be pressed first and then the number being dialed.
b. If the phones do connect to one another, perform troubleshoot as necessary. Reset the phone
using steps from a previous exercise if necessary.