


3 - 165 IP Telephony v1.0 Lab 2.1.1a Copyright © 2005, Cisco Systems, Inc.
Step 1 Assign a Pod Number
a. Ask the instructor to assign a pod number to the lab group.
What pod number was the group assigned? ____________________
Step 2 Erasing Configuration and VLANs from the Router
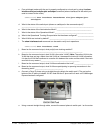
a. The router with a four port switch module stores VLAN information in Flash memory. To ensure
the router does not have a previous configuration, connect a console cable to the router and
power on the router.
b. Erase the switch VLAN database and startup-configuration file by using the delete
flash:vlan.dat, erase startup-config, and reload commands.
Router# delete flash:vlan.dat
Router# erase startup-config
Router# reload
Step 3 Basic CME Router Configuration
a. On the router, enter privilege mode and then configuration mode.
b. Change the hostname of the router. Use the command hostname CMERouterX, where X is the
pod number assigned to the group. Throughout the rest of the lab, use IP Telephony Table 1
parameters based on the pod number assigned.
Router(config)# hostname CMERouterX
c. Set the enable secret password to cisco. (Do not deviate from this password.)
d. Use the command no ip domain-lookup to disable name resolution since there is no DNS
server in the classroom lab.
CMERouterX(config)# no ip domain-lookup
e. Note that router commands are IOS and model specific. Examples given in this lab are the most
common configurations seen. However, the command may vary slightly. For example, on a 1760
router the VTY lines are 0 through 15 instead of 0 through 4. Configure all the router VTY lines
with parameters similar to the following:
CMERouterX(config)# line vty 0 4
CMERouterX(config-line)# password cisco
CMERouterX(config-line)# login
CMERouterX(config-line)# logging synchronous
f. Configure the console port parameters.
CMERouterX(config)# line console 0
CMERouterX(config-line)# password cisco
CMERouterX(config-line)# login
CMERouterX(config-line)# logging synchronous