


107 - 165 IP Telephony v1.0 Lab 5.1.8 Copyright © 2005, Cisco Systems, Inc.
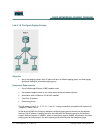
• Configure a second intercom on the two IP phones
• Test that the intercom works and that the analog phone can access the intercom
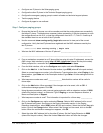
Step 1 Configure the dialable intercom
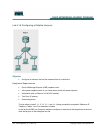
a. Ensure that the two IP phones can call one another and that the analog phone can successfully
dial either IP phone. Troubleshoot as necessary before proceeding.
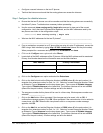
b. Use the command show running-config | begin tele command to view part of the current
configuration. Verify that two IP phones have registered, and the MAC addresses used by the
two phones are shown in the configuration output.
CMERouterX# show running-config | begin tele
c. What are the MAC addresses for the two IP phones? ________________________________
___________________________________________________________________________
d. From a workstation connected to an IP phone (that can ping all router IP addresses), access the
CME using a Web interface by typing http://10.X0.0.1/ccme.html
(where X is the pod number).
When prompted for a username and password use ACMEadmin and cisco.
e. Click on the Configure menu option and select Phones.
f. Locate both of the MAC addresses of the IP phones. Write the MAC address and its associated
Primary Line Number based on the information seen on the Web interface.
MAC Address Primary Line Number
g. Click on the Configure menu option and select the Extensions.
h. Click on the Add link and set the Extension Number to XXXX (where X is the pod number). An
example of an extension number for Pod 1 is 1111. Select an unused Sequence Number. Select
an Extension Type of Intercom from the drop-down menu. Type a name of Dialable Intercom.
Type a label of Dialable Intercom in the Label field. The Intercom Number will be set to XXX0
(where X is the pod number). All other settings are left to the default.
i. The sequence number for this phone will be used in a future step. What sequence number was
selected? _________________
j. Click on the Add button. When prompted if the changes are to be saved, click on OK. A
confirmation message appears. Click OK. When prompted if the next extension is to be added to
a new phone, click OK. When the No new phone to add or no sequence number message
appears, click OK.
k. Click on the Add link and set the Extension Number to XXX0 (where X is the pod number). An
example of an extension number for Pod 1 is 1111. Select an unused Sequence Number. Select
an Extension Type of Intercom from the drop-down menu. Type a name of Dialable Intercom.
Type a label of Dialable Intercom in the Label field. The Intercom Number will be set to XXXX
(where X is the pod number). All other settings are left to the default.