


Chapter 3 Installing the Cisco IP Phone
Connecting the Cisco IP Phone to the Network
3-4
Cisco IP Phone Administration Guide for Cisco CallManager 3.2, Cisco IP Phones 7960/7940/7910
78-10453-04
Warning
The plug-socket combination must be accessible at all times because it serves
as the main disconnecting device.
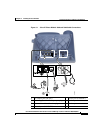
Connecting the Cisco IP Phone to the Network
You must connect the Cisco IP Phone to the network and to a power source before
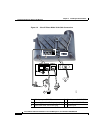
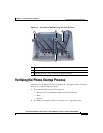
using it. Refer to Figure 3-1 and Figure 3-2 for graphical overviews of the
procedures that follow.
To install a Cisco IP Phone, perform these steps.
Procedure
Step 1 Connect a Category 3 or 5 straight-through Ethernet cable from the switch to the
network port on the phone.
See the “Connecting to the Network” section on page 2-6 for guidelines. Each
Cisco IP Phone ships with one Ethernet cable in the box.
Step 2 Connect the handset and headset to their respective ports.
See the “Connecting a Headset to a Cisco IP Phone” section on page 2-9 for
supported headsets.
Step 3 Connect a Category 3 or 5 straight-through Ethernet cable from another network
device, such as a desktop computer, to the access port on the phone (optional).
See the “Connecting to the Network” section on page 2-6 for guidelines.
Note This option is not available on all Cisco IP Phone 7910 models. There are
two versions of this phone and their only distinction is whether the access
port is present. The Cisco IP Phone 7910+SW has an access port, and the
Cisco IP Phone 7910 does not.
Step 4 Connect the power plug to the Cisco AC Adapter port (optional).
See the “Providing Power to the Cisco IP Phone” section on page 2-7.