


1-9
Cisco ATA 186 and Cisco ATA 188 Analog Telephone Adaptor Administrator’s Guide (SCCP)
OL-3141-01
Chapter 1 Cisco Analog Telephone Adaptor Overview
Installation and Configuration Overview
Installation and Configuration Overview
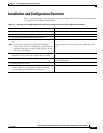
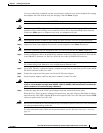
Table 1-3 provides the basic steps required to install and configure the Cisco ATA to make it operational
in a typical Cisco CallManager environment.
Table 1-3 Overview of the Steps Required to Install and Configure the Cisco ATA and Make it Operational
Action Reference
1. Plan the network and Cisco ATA configuration.
2. Install the Ethernet connection.
3. Install and configure the other network devices.
4. Install the Cisco ATA but do not power up the Cisco ATA
yet.
Note If you power up the Cisco ATA before adding the
Cisco ATA to the Cisco CallManager, you will need to
perform a reset once you have added the Cisco ATA to
the Cisco CallManager.
What the Cisco ATA Package Includes, page 2-2
Resetting the Cisco ATA Using Cisco CallManager, page
3-23
5. Download the desired Cisco ATA release software zip file
from the Cisco web site, then configure the Cisco ATA.
Chapter 3, “Configuring the Cisco ATA for SCCP”
6. Add the Cisco ATA to the Cisco CallManager. Chapter 4, “Adding the Cisco ATA to the
Cisco CallManager”
7. Power up the Cisco ATA.
8. Periodically, you can upgrade an individual Cisco ATA or
all Cisco ATAs to a new signaling image by using the
Cisco CallManager administration web pages.
Chapter 7, “Upgrading the Cisco ATA Signaling Image”