


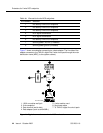

Auxiliary power supplies
555-233-116
38 Issue 4 October 2002
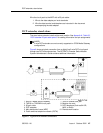
Powering up and testing AC and DC power
When you power up the unit or interrupt power to a unit, the unit runs an AC or DC
self test. LEDs on the front panel indicate the status of the power supply. The
following table lists the LEDs.
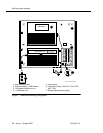
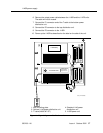
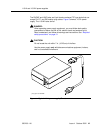
1. Connect the AC power cord to the power supply, and route the cord to an
appropriate AC outlet using the clips provided on the unit.
NOTE:
A maximum of four power supplies can be powered from one
dedicated 110 VAC, 20-A feeder. Use only unswitched receptacles.
2. Start the AC test by plugging the cord into the outlet.
This powers up the power supply.
3. Check AC operation of the 1145B power supply by monitoring the LEDs:
PASS: GREEN and YELLOW are both lit.
FAIL: either GREEN or YELLOW LED is not lit.
4. If the AC test failed, test the AC outlet, power cord, and connections.
5. If the AC test failed, but power is available and the AC power cord and
connections are good, replace the power unit.
6. Once the AC test passes, activate the DC battery-backup supply by
disconnecting the AC plug.
7. Check DC (battery back-up) operation by monitoring the LEDs.
PASS: RED and GREEN are both lit.
FAIL: either RED or GREEN is not lit.
8. If the DC test fails, check the connections.
9. If the DC test fails but the connections are good, replace the batteries and
retest.
10. If the DC test fails after you replace the batteries, replace the power supply.
11. Once the DC test passes, reconnect AC power to the power supply.
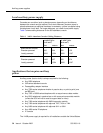
Table 8. Power-supply LEDs
LED Color Meaning
GREEN Power supply is providing power
YELLOW Battery is charging (after at most 20 hours, when the battery has
reached full charge, the YELLOW LED should go out)
RED Power supply is on battery reserve