


Section 5 TutorialSection 5 Tutorial
2. Make sure there is enough room on all axes of the machine to run the current G-Code
file from the program zero point. The LCBLT.AGC program needs +2.125 inches on
the X axis, +1.625 inches on the Y axis and -.55 inches on the Z axis.
3. Fixture a sheet of 1/8” or thicker plastic (preferably machine grade) or aluminum at
least 2” wide and 4” long onto the XY table of the machine tool. Be sure that all
clamps and fixturing tools are well out of the way of the tool during all parts of the
program. This program will run best with a 1/16” endmill.
4. Jog the tool to the -X, -Y corner of the workpiece using Jog mode. Now, carefully jog
the tool down in the Z axis until it just barely touches the top of the workpiece. We
recommend using a feeler gage to do this and then jogging down the exact thickness of
the feeler gage to touch the part.
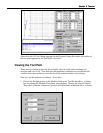
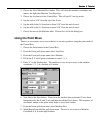
5. To define this point as Program Zero, choose the Set button next to the Program label,
then choose Zero All in the dialog that immediately follows.
6. Using either Jog mode or Point Mode, bring the tool up in the Z axis exactly 1.0” and
again define this point as Program Zero by choosing the Set button next to the Program
label and Zero All in the dialog that follows. Note that this point is exactly 1” above
where it needs to be to actually cut the workpiece. The machine is now ready to do a
“dry run” without cutting the workpiece.
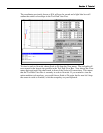
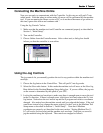
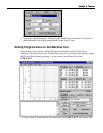
Testing the Program on the Machine Tool
It is always a good idea to do a “dry run” of the G-Code file both in offline and online
modes before cutting a part. This way you can make sure the tool behaves as intended
before cutting the part.
1. Put LC into G-Code mode by choosing the G-Code button in the Control Box.
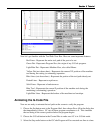
2. Make sure the G-Code program is reset by choosing the Reset button on the Control
Box, then OK in the confirmation dialog.
3. Take the Controller offline by choosing Offline from the Controller menu.
4. Go into step mode by choosing the Step radio button in the Control Box.
5. Repeatedly choose the Start button, watching the screen to make sure the tool behaves
properly.
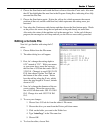
6. Once you are satisfied the program will behave properly, re-establish communications
with the Controller by choosing Online from the Controller menu. A dialog will ask
you if you want to revert to the coordinates used before going offline. Choose OK.
7. Go into step mode by choosing the Step radio button in the Control Box.
8. Choose the Start button. The machine should move in the X and Y axes and then stop.
Note that everything else is identical to offline mode.
9. Step through the entire program by choosing the Start button for every line of G-Code.
If you have to stop the tool at any time, you can either choose the Feed Hold button
with your mouse or hit any key on your keyboard. If you stop the tool in the middle of