


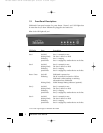
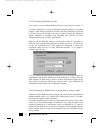

SERIAL Attach the supplied serial cable (RS232) that connects
TalkSwitch to your PC. If you use the serial port you
cannot use the USB port simultaneously.
POWER Plug the supplied AC Power Adapter in here. Rating:
16VAC 1.1 A output. Do not use any other power adapter
as this may cause damage.
By default, TalkSwitch is set to Serial connection. To activate USB connection, dial
91 from an extension then reset TalkSwitch. To return to Serial connection, dial
90 and reset TalkSwitch.
The ‘PF’ box in between E4 and L1/L2 represents power failure support. In the event
of a power failure or loss of power to TalkSwitch, Extension 114 will be able to receive
calls and make calls on Line 1.
1.3.2 The TalkSwitch 48
JJ
JJ
aa
aa
cc
cc
kk
kk
ss
ss
//
//
PP
PP
oo
oo
rr
rr
tt
tt
ss
ss
WW
WW
hh
hh
aa
aa
tt
tt
tt
tt
oo
oo
pp
pp
ll
ll
uu
uu
gg
gg
ii
ii
nn
nn
MUSIC Plug in a radio, CD player, PC soundcard or any other
device that emits an audio signal if you wish to use
TalkSwitch's Music-on-Hold feature. This is a 1/8" (3.5
mm) phono jack. Mono cables are recommended. If you
have multiple TalkSwitch units on a LAN, you will need
to provide a music source to each TalkSwitch.
PA Connect to a P.A. system if you wish to use the external
paging feature. This is a 1/8" (3.5 mm) phono jack.
Mono cables are recommended. If you have multiple
TalkSwitch units on a LAN, you will need to provide a
connection from each TalkSwitch to the PA Amplifier.
4 TalkSwitch User Manual
LAN
MEMORY SLOT
USB SERIAL POWER
MUSIC
L1
/
L
2
L2
PA
E1
E2
E3
E4
PF
L3/L4
L4
E5
E6
E7 E8
TS-user manual 7th ED v3 Release.qxd 8/27/02 4:56 PM Page 4