


532.0 Configuring TalkSwitch
3. Answered at ext. - routing options when this extension 'rejects' a screened
call.
Selecting 'play caller’s name first' will prompt callers, when they choose this
extension at the Auto Attendant, to record their name. When you answer the
call at the extension, it will announce the caller (by playing their recording),
at which time you can choose to accept the call by pressing or reroute the
call to the Cascade options on this tab by either hanging up or pressing .
Routing options include forwarding calls to a Local Extension, Remote
Extension, Extension Ring Group, built in Voicemail, Announcement, Auto
Attendant or hang up. In the case where ‘hang up’ is selected, TalkSwitch will
first play the following prompt before hanging up: “I’m sorry, that extension
is unavailable at this time. Please try again later.”
4. Do not Disturb - routing options when this extension has engaged the 'Do
not Disturb' feature
The Do not Disturb feature is toggled on or off by dialing 62 from a Local
Extension handset. Cascade options include forwarding calls to a Local
Extension, Remote Extension, Extension Ring Group, built in Voicemail,
Announcement, Auto Attendant or hang up. When Do not Disturb is enabled,
you will hear “Do not disturb on” before the dialtone as a reminder since no
calls will ring through to your extension. You may still dial any digits during
this prompt.
In the Cascade sequence, only choosing an extension (Local, Remote or Ring Group)
will allow you to choose an option in the next line. Any other selection is considered
an end-of-call option. Note as well that the last line in the Cascade sequence only
allows the choice of an 'end-of-call' option. This is done so the chance of a caller being
“looped” within the system is removed.
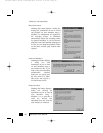
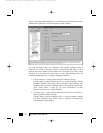
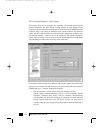
Adding selections to a Call Cascade that are not yet configured:
If while configuring the Cascade sequence you require a Local Extension, Remote
Extension, Ring Group, Voice mailbox or Announcement that has not been
activated as yet, you can easily add the required selection by choosing 'new'. If
chosen, a screen will appear (depending upon which type is chosen). Simply fill
in the required information to add the new option to the selectable list.
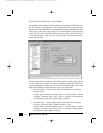
The information given in the 'Add new...' screens will be reflected within their respective
sections. For example, if you add a new Remote Extension (let’s say 211), when you
go to the Remote Extensions section you will see that extension 211 has the information
previously filled in the 'Add new Remote Extension' screen. You will also note that not
all the information displayed in the extension tabs are available in the 'Add new...'
screens. This is because only the information that effects the original extension’s Call
Cascade functionality is offered.
TS-user manual 7th ED v3 Release.qxd 8/27/02 4:57 PM Page 53