


NSQ412 Four-Line Caller ID Telephone Owner’s Manual 15
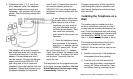
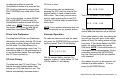
12. Follow these steps if the station will
be installed on screws securely fas-
tened to the wall. If telephone lines
1 and 2 are on one jack and tele
phone lines 3 and 4 on another jack
see the following connection draw-
ing. Otherwise go to step 13.
Connect telephone jack 1 to the
NSQ412 L1/L2 jack using one of the
4-conductor telephone line cords
supplied with the telephone.
Connect telephone jack 2 to the
NSQ412 L3/L4 jack using the other
4-conductor tlephone line cord sup
plied with the telephone.
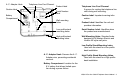
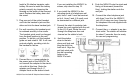
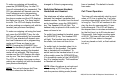
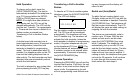
13. If telephone lines 1, 2, 3 and 4 are
all on separate jacks, two adapters
and extra telephone line cords are
necessary (not included with the
telephone). See the following con-
nection drawing.
The adapters will convert two sepa-
rate telephone jacks into a single
one. Connect telephone line 1 into
the adapter. Connect telephone line
2 into the adapter. Connect the
adapter output jack into the NSQ412
L1/L2 jack using one of the 4-con-
ductor telephone line
cords supplied with the
telephone. Repeat this
process using the sec-
ond adapter for tele
phone lines 3 and 4.
Connect the output of
the second adapter jack
to the NSQ412 L3/L4 jack using the
other telephone line cord supplied with
the telephone.
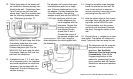
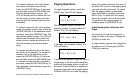
14. Using the supplied screw template,
install the screws into the wall. Be
sure to use anchors to ensure a
secure mounting. Leave the screws
protruding from the wall 3/16”.
15. Hold the station close to the screws
and align them with the wall mount-
ing holes on the NSQ412’s back.
Push the station onto the screws
and firmly pull downward (towards
the floor), locking the station to the
wall.
16. Connect the a. c. adapter to an elec-
trical outlet. The station will initialize for
about 7 seconds, then be ready for use.
The telephone has the program-
ming set to the most common
selections. See the Quick
Reference Card to begin using
it immediately. Refer to the
Programming section of this
manual for customizing the sta-
tion’s operation and the Feature
Sections for advanced operation
and use.
Lines 3/4
Lines 1/2
A.C. Power
2 LINE ADAPTER
2 LINE ADAPTER
Line 1
Line 2
Line 4
Line 3