


IPedge
Preferences
IPedge UG 06/11 TOSHIBA 119
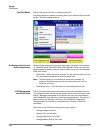
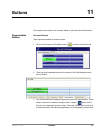
When the design is complete, then you can easily change to this skin by right-
clicking the mouse on the logo on the main window and selecting the skin name
from the Phone Colors menu.
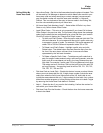
Skins Files Each skin design is saved in a file, which is a file starting with "skin_" and ending
with ".INI". These files are stored along with other configuration data on your PC
in the Local Settings Call Manager folder\skins. A number of basic skin designs
are included with Call Manager.
Saving/Creating
New/Deleting
Skins
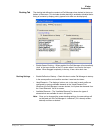
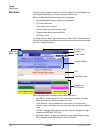
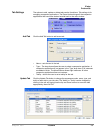
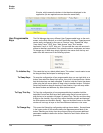
Icons next to the skin name provide easy access to save, save as, create new,
and delete skin functions. Some of these icons can also be accessed using the
application menu button. To exit the skin editor, just click the cross icon on the top
right corner of the skin editor.
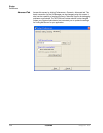
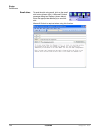
To Create a New Skin Click the "new" icon, and a "Skin Name" dialog will pop up to allow you to enter
the name of the skin. The new skin, initially, will have current existing configuration
as you see on the skin editor. You can start changing it.
To Load an Existing
Skin
Click on Skin Name drop down list to load an existing skin.
To Save a Skin Once changes have been made, click the Save icon to save it.
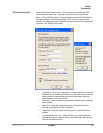
To Save As a Skin When creating a new Skin, changing an existing skin, or to save a skin using a
different name, click the Save As icon. A "Skin Name" dialog will display. Enter the
new skin name.
To Delete a Skin With the Skin loaded to be deleted, click the Delete icon. Click Yes in the dialog
box to confirm the action. The system should have at least one skin; deleting the
last skin will be rejected.