


Voice over IP (VoIP) Quick Start
60
7.1.2 External SIP Line
If your Aastra 800 has access to the Internet, you can an easily and quickly set up
an SIP line.
1. Request at least one SIP account from an SIP provider.
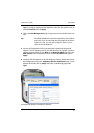
2. Call up the Configurator and go to the page Telephony: Trunks: SIP Provider.
If your SIP provider is not listed, click on New. Otherwise select the precon-
figured SIP provider. Enter the Name, Domain (DNS name of the SIP ID). Enter
the SIP server’s IP address under Proxy/Registrar and an IP address under
STUN Server and STUN Port where necessary. You can obtain more infor-
mation on this from your SIP provider. Click on Apply.
3. On the Telephony: Trunks: SIP trunks page, click on New. Activate the Status
and enter a name for the account under Name. Select the SIP Provider. Enter
the relevant account information under User name, Password and Phone No..
Click on Apply.
4. To use the SIP account by default, call up the page Telephony: Trunks: Route
and select the route External trunk. Under Bundle/SIP trunks 1, select the
SIP account you have just set up. Click on Apply.
Note: The Telephony: Trunks menu page is only displayed
if you activate the Level: Expert option on the opening page
of the Configurator.
5. Check that the SIP connection is active on the System Info: Telephony:
Trunks page. Also check the SIP license count on the System: Licences page.
Check the functionality by making an external call. You should assign the relevant
external number of the SIP account to the internal numbers on the page
Telephony: Call distribution: Incoming.
7.1.3 Internal SIP Telephony
SIP telephones connected via LAN or SIP telephony software on LAN workstation
computers can also be operated with the Aastra 800.
1. Call up the Telephony: Devices: VoIP Phones page in the Configurator. Click
on New. Select the desired Aastra SIP telephone (Aastra 675xi) option under