


Chapter 1 Page 5
To upgrade:
1. Read the Getting Started guide for an overview of the complete
installation process.
2. Synchronize your old organizer with your old Palm Desktop
software. This ensures that the latest information from your
organizer is on your desktop computer.
3. (Optional) To ensure against any data loss, go to the folder that
stores Palm Desktop software, copy the folder and all its contents,
rename it (for example, Palm Backup), and store the copy outside
the Palm Desktop software folder.
4. Follow the installation instructions in “Installing Palm Desktop
software” later in this chapter. Be sure to install the new software
in the same folder as the old software.
5. To prepare for the first HotSync operation that synchronizes your
new organizer with your new Palm Desktop software, go to the
HotSync Manager and choose Custom.
Note:
Be sure your username appears in the box at the top of the
Custom dialog box. If not, select your username.
6. For all conduits, click Change and select the option Desktop
overwrites handheld. Then click Done. See “Customizing HotSync
application settings” in Chapter 6 for more information.
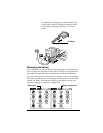
7. Place your new organizer in the cradle and press the HotSync
button. If the Select User dialog box appears, select your username.
Note:
If you customized the modem setup on your old
organizer, you must re-enter the modem init string.
Any passwords you set on your old organizer are not
restored during this HotSync operation. Records you
previously marked Private are still marked Private, but
you need to reenter a password on your new organizer.
Each organizer must have a unique name
After you complete the upgrade process described above, you have
two organizers with the same name. This is an undesirable situation.
Each organizer must have a unique name in order to prevent
unexpected results during HotSync operations and other
complications.
We strongly recommend that you perform a hard reset on your old
organizer. See “Performing a hard reset” in Appendix A for details.