


Configuring Intercoms
40
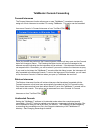
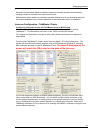
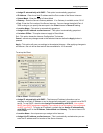
• Factory Default - This setting has no effect.
• Door / Relay Control - for use on models that have an integrated relay. The Door/Gate
button will become visible in the Intercom View / Custom View. Pressing the Door/Gate
button will engaged the relay for the number of seconds specified (defaults to 5 seconds)
• Logic Input - used with custom developed applications to monitor other equipment.
• Activate On MIC / Speaker - Selecting this option turns on GPIO 4 (or the onboard Relay if
present) when ever the Intercom’s Microphone and/or Speaker are activated. When both
Mic and Speaker are checked, the Intercom will wait for 1 second of inactivity before turning
off GPIO 4. Use of the Mic option requires the Intercom’s OS Version to be 1.9.5.74Y or
higher.
• Activate on PTT - activates GPIO4 (or the onboard Relay if present) when the Intercom’s
button is pushed
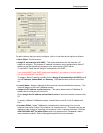
Remote Listen Disable - disables the ability to remotely turn on the Intercoms Microphone.
With this option set, the Intercom Operator must press the PTT button on the Intercom in order
for the other end to listen to the Intercom.
Default to Listen (Direct Mode) - is only available if option Set as Server Intercom is enabled.
Enables the Server Intercom in Direct Mode to automatically turn on the remote Intercom’s
Microphone when the Intercoms connect.
No Beep Tone After PTT Released - turns off the soft beep that is played on the intercom
after the PTT button is released
Display in Custom View Tab - will force the Intercom to appear in the Custom View tab, even
if it is included within a Paging Group.
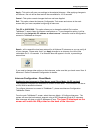
Door Relay Activate - on IP Intercom models that include a relay for opening a door or gate,
this option sets the number of seconds that the intercom’s relay will stay active when the
Door/Gate button is pressed in the Intercom View / Custom View. This is used in conjunction
with GPIO 4 - Door / Relay Output
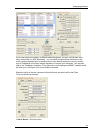
Call Button - Changes the Intercoms PTT button to a Call button. Prevents audio from being
transmitted when the button is pressed. See PTT button vs Call button topic. This option is
not valid in Direct Mode or when the Remote Listen Disable option has been selected
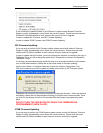
PTT Button vs Call Button Feature
By default, when the PTT button on an Intercom is pressed, the Intercom’s microphone is
turned on and the audio is transmitted to TalkMaster™. TalkMaster receives the audio,
records it, places an entry in the Calls Waiting Queue and sends the "Your call is being
connected" message to the intercom. If desired, the TalkMaster operator can play the audio
back by double-clicking the entry in the Calls Waiting Queue. When the TalkMaster operator
activates the Listen button, the Intercom’s microphone automatically switches on so the
Intercom user can operate in Hands Free mode.
When the Call Button feature is enabled for an intercom, the PTT button’s function is changed
to a Call button. When the Call button is pressed, a short signal is transmitted to TalkMaster.
TalkMaster receives the signal, places an entry in the Calls Waiting Queue and sends a signal
to play a two tone beep on the Intercom. No audio is captured in the Calls Waiting Queue
using this option. When the TalkMaster operator activates the Listen button, the Intercom’s
microphone automatically switches on so the Intercom user can operate in Hands Free mode.
Intercoms in Call Button mode play a two-tone beep whenever they connect to TalkMaster.
The Call Button feature has been implemented for customers who are not able to support
multiple concurrent audio connections due to low bandwidth TCP/IP connections. It can also