


Chapter 3: Custom Setup 23
Step 7: Customize Network Settings
You can customize network settings from the Base Station Management Tool. For
example, you can perform the following tasks:
O
Block or permit specific Web sites or Web content by using parental controls.
O
Establish a Web or mail server on your network by using persistent port forwarding.
O
Control access to your network by using MAC filtering.
O
Control what computers on your network can access the Internet by using client
filtering.
O
Map ports for specific Internet games by using application-triggered port forwarding.
For information about these options, consult Broadband Network Utility Help or the
MN-700: Base Station Configuration Guide. You can find this guide on the Setup CD
that came with your network products.
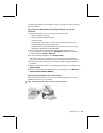
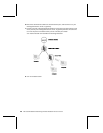
Step 8: Configure Your Computer
When you set up the base station by using the Base Station Management Tool, you
must configure the TCP/IP properties of each computer that you connect to your
network. If you are using a Microsoft adapter, the correct settings are established
automatically when you run the Setup Wizard. If you are using a non-Microsoft adapter,
or if you do not want to run the Setup Wizard, you can configure the TCP/IP properties
from Windows.
In general, you should configure the computer to use the TCP/IP protocol and to obtain
an IP address automatically. However, if you disable the DHCP server on the base
station or if you want one or more of your networked computers to use a static IP
address, you must configure the computer to use a static IP address. For information
about how to establish a static IP address for a computer on your network, see
Broadband Network Utility Help.
Note The TCP/IP properties you set are stored on the adapter connected to your
networked computer. If you change adapters, you must reconfigure these settings for
the computer.
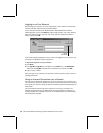
To configure the TCP/IP properties of a computer running Windows 98,
Windows 2000, or Windows Me operating system
1. Click Start, point to Settings, and then click Control Panel.
2. Double-click the Network icon.
3. In the Configuration dialog box, select the TCP/IP protocol line that is associated
with your network adapter.
4. Click the Properties button, click the IP Address tab, and then select Obtain an IP
address automatically.
5. Click the Gateway tab and make sure that all fields are empty, and then click OK.
When the Network Properties dialog box appears, click OK again.
6. If you are prompted to supply the original Windows installation files, insert your
Windows CD-ROM into the CD-ROM drive, and then browse to the location of your
CD-ROM drive.
7. When you are prompted to restart your computer, click OK.