


Assigning Individual Lines to Buttons
To assign individual lines to buttons:
1. If you have not already done so, enter administration mode by following
the boxed instructions on page 25.
2. Touch
Adm Tel.
The lights next to the adrninistration mode buttons stop flashing, and the
green tight next to
Adm Tel
remains on.
3. Dial; the intercom number (15, for example) or touch the Auto Intercom but-
ton for the voice terminal to which you want to assign lines.
If the voice terminal is idle, a steady green light comes on next to its Auto
Intercom button, and the system gives you a 2-beep signal to begin.
If the voice terminal is being used, the green lights next to the Auto Inter-
com button and
Adm Tel
flash rapidly. You must wait until the green lights
become steady or else try again later. If you try to assign lines to buttons
at a busy voice terminal, the system will beep and you will not be able to
proceed.
4. Refer to the Voice Terminal Configuration Form to see which individual
lines should be assigned to this voice terminal. Steady green lights show
next to any lines currently assigned to the voice terminal. Steady red lights
show next to all lines contained in any system pool.
5. To add a line to or remove a line from this voice terminal, touch the button
for that line. The green light next to the line button tells you its current status.
Each touch of the line button gives you one of the following codes:
Green light on =
line is assigned to the voice terminal
Green light off =
line is not assigned to the voice terminal
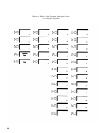
The order in which you touch the buttons during administration determines
the order in which lines appear on the voice terminal. For example, sup-
pose that you have three individual lines to assign to a voice terminal that
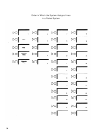
has Dial Access to Line Pools. These lines appear in alphabetical and
numerical order on your administrator/attendant console, as shown on
pages 85 and 86. If you touch the button for line B2 first, it will be assigned
to the first available position on the voice terminal, in this case the top but-
ton in the first column above the dial pad. If you touch the button for line
Al next, it will be assigned to the next available position, the bottom but-
ton in the second column. Touching the button for line AO will assign that
line to the next available button, the button above the line Al button.
NOTE:
If you plan to assign a personal line to a voice terminal, be sure
not to assign the line to any voice terminals that should not have access
to that line.
6. Repeat steps 3 through 5 for each voice terminal in your system.
If you want to give a voice terminal the same line assignments as one that
is already set up, use this shortcut:
NOTE:
When you copy line assignments, you also copy call restrictions,
Dial Access to Line Pools, and allowed-list permissions.
●
Dial the intercom number or touch the Auto Intercom Button of the
new voice terminal.
●
Touch
Copy.
●
Dial the intercom number or touch the Auto Intercom button of the
original voice terminal.
7. Touch
Adm Tel.
The lights next to the administration mode buttons flash again.
8. Continue to administer your system, or leave administration mode by
following the boxed instructions on page 25.
36