


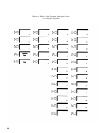
5. Set switch G.
NOTE:
The instructions that follow apply if switch F is set to Pooled. If
switch F is set to Square, switch G may beset to either position without
having any effect on the system.
●
●
If you have decided to arrange your pooled system so that people
can access line pools directly by simply touching the associated
button on a voice terminal, set switch G to Button Access (down).
If you have decided to arrange your pooled system so that people
can access any line pool by dialing the pool’s access code, set
switch G to Dial Access
(up). You
must set switch G for Dial Access
if you want to use Automatic Route Selection. Even if you set your
system for Dial Access to Pools, you can still program buttons at
individual voice terminals to provide one-touch access to particular
line pools.
6. Set switch H.
●
If you have eight or fewer outside lines and 20 or fewer voice ter-
minals, set switch H to 1-8 Lines (up).
NOTE:
The switch setting you select does not always have to cor-
respond to the number of outside lines you actually have. For ex-
ample, if you have eight or fewer lines but plan to grow beyond eight
lines within a year or two, you might prefer to set switch H to>8
Lines (down) in order to simplify administering the system later. If
you change the setting of this switch later, you cancel any special
line administration of programmed features on your attendant
consoles.
●
If you have more than eight outside lines or more than 20 voice ter-
minals, or if you expect your system to grow to this size in the next
year or so, set switch H to >8 Lines (down).
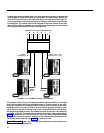
7. If your system has an SMDR (Station Message Detail Recording)
Module and a printer with an RS-232 connector, connect the printer to
the SMDR Module (refer to the instructions that come with the module).
8. Turn on the control unit by setting the On/Off switch on the Power
Module to On (right). This causes the system to record the changes you
just made. The warning light on the module will go on. Wait for the light
to go off before continuing. If you have a printer hooked up, a page
header will be printed.
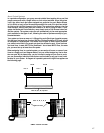
9. If your system has a Services Module, make the following adjustments.
Otherwise, go to step 10.
●
If you have background music through a loudspeaker paging
system, you can adjust its volume by turning the Bkgd Vol control
clockwise to raise the volume, or counterclockwise to lower it. If
you do not have background music through a loudspeaker pag-
ing system, turn the control counterclockwise as far as it goes.
●
If you have Music-on-Hold, you can adjust its volume by turning
the MOH Vol control clockwise to raise the volume, or
counterclockwise to lower it. If you do not have Music-on-Hold, turn
the control counterclockwise as far as it goes.
●
If you have a music source with its own amplifier, set the Level
switch to Hi (down); otherwise, set the switch to Lo (up).
●
If you have a loudspeaker paging system and want a short tone
to precede loudspeaker announcements, set the Page Sgnl switch
to On (up). Otherwise, set the switch to Off (down).
10. If you are setting up a new system for the first time, enter administra-
tion mode, as described on page 25, and continue following the pro-
cedures in this section.
23