


Configure the network 103
Procedure 6
Connecting to the WLAN IP Telephony Manager 2245 through Telnet
Step Action
1
Run a Telnet session to the IP address of the WLAN IP Telephony
Manager 2245.
2
Enter the login and the password.
Note: The login name and password are case-sensitive.
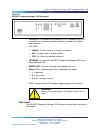
The NetLink SVP-II System menu appears. The following menu
choices are available:
•
System Status—view software code version, error messages,
and status of operation. See "Viewing software version" (page
113) and "Troubleshooting" (page 119).
•
SVP-II Configuration—set the mode and reset the system. See
"Configure the WLAN IP Telephony Manager 2245" (page 106).
•
Network Configuration—set network configuration options,
including IP addresses and hostname. See "Configure the
network" (page 103).
•
Change Password—change the password for WLAN IP
Telephony Manager. See "Change the password" (page 108).
•
Exit—exit the menu.
—End—
Configure the network
Select Network Configuration on the NetLink SVP-II System screen
to configure the IP address and other network settings of the WLAN IP
Telephony Manager 2245. An optional Hostname and the IP address of
TFTP Server containing the software update files are also configured here.
Configure the following Network Configuration screen fields with information
provided by the network administrator:
•
IP Address:—enter the complete IP address for the WLAN IP Telephony
Manager 2245, including digits and periods.
Note: If this WLAN IP Telephony Manager 2245 is the master, it must
have a static IP address configured. Do not use DHCP to assign the IP
address of the master WLAN IP Telephony Manager 2245. Other WLAN
IP Telephony Managers 2245 in a multiple WLAN IP Telephony Manager
2245 environment can have their IP address assigned by DHCP.
Nortel Communication Server 1000
WLAN IP Telephony Installation and Commissioning
NN43001-504 01.02 Standard
Release 5.0 15 June 2007
Copyright © 2004-2007, Nortel Networks
.