


P A Y C L O C K U S E R ’ S G U I D E
65
NOTE: If the above two options are not selected the integration
process will fail!
Click Continue and then click Done.
In PayClock click Next.
Map the QuickBooks Payroll Items to the PayClock Pay
Codes.
When finished mapping the payroll items click Next.
If desired select the Send Employee pay rates from
QuickBooks to PayClock. Click Next.
If Classes are set up in QuickBooks map the QuickBooks
Classes to the PayClock departments. Click Next.
Give the export a unique name if multiple pay classes are to
be set up to integrate with QuickBooks. For example give it
the name of the pay class it is linked with.
Click Finish. PayClock will synchronize with QuickBooks and
will display the Resolve Employee Conflicts window.
At the Resolve Employee Conflicts window match
QuickBooks employees to PayClock employees.
Choose Create New Employee for any hourly employee not
listed in PayClock.
For salaried employees, choose Import as Inactive.
Click Save.
Once the export is configured PayClock will automatically get any
new employees or edited employees from QuickBooks when
PayClock is opened.
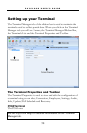
At the end of the pay period click the Export button on the
Timecard tab to send the pay data hours from PayClock to
QuickBooks.