


P A Y C L O C K U S E R ’ S G U I D E
36
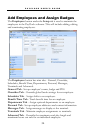
5. If your company uses an Employee Number, enter it here.
Usually, payroll services require an employee number for exports.
6. PayClock automatically fills in the Employee PIN but you can
change it if you like. To change the PIN, enter the number in the
Employee PIN field. Note: The Employee PIN is not supported
with the USB terminals.
7. Enter the employee’s hourly wage under Hourly Base Pay.
8. If the employee is salaried select the Salaried Hours option and
enter how many hours the employee is expected to work during
the pay period.
Note 1: Reports will use the hours you have entered in this field.
Any punches will be ignored in reporting.
Note 2: Employees with the Salaried option selected can not be
exported. The Do Not Include in Exports option will be checked
and will be dimmed.
9. From the list under Type of Employee choose whether this
person is Regular, Temporary, Seasonal or Contract.
10. At Pay Class select the pay class to use for the employee. This
setting determines which pay period and overtime rules will be
applied.
11. At Home Department, select the employee’s home department.
12. Check the Allow Supervisor Functions box if this employee can
perform supervisor functions at the terminal, such as adding or
deleting punches.
13. At Do Not Include in Exports check this box if you do not want
to include this employee in the file you export for payroll.
14. Check the Enable Lockouts option if you want to restrict
employees from punching In too early or Out too late.
15. Enter the employee’s hire date under Date of Hire.
16. Click Save to keep your changes.