


20
english
Jabra PRO 9460, Jabra PRO 9460 DUO, Jabra PRO 9465 DUO AND Jabra PRO 9470 USER MANUAL
For Jabra PRO 9460:
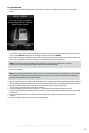
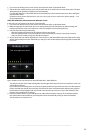
1. The touchscreen wizard prompts you to select either a manual or a guided setup, as shown in the figure
below:
DESK PHONE
Do you prefer a guided
(recommended) or manual
Desk Phone setup?
Manual Guided
Figure 15: Manual or guided setup available
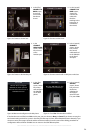
If you know exactly which clear dial-tone position and mic. level you need (you probably work in the IT dept.),
you can select Manual. Otherwise, we strongly recommend you select Guided.
In the manual setup, the wizard prompts you first to select a clear dial-tone position on the base’s switch and
then a mic. level. Neither one of your selections will be tested by the Jabra test server.
Note: For both the manual and guided setup procedures, you just need to follow the on-screen
instructions. The guided setup procedure is outlined in the following steps.
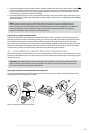
2. Put on the headset.
Note: If your setup includes an EHS or RHL, you do not use the headset in this procedure as you do not listen
for a dial tone (it is detected automatically). However, you still need to select switch positions manually for
testing, when prompted to do so by the wizard.
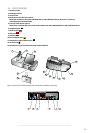
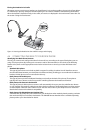
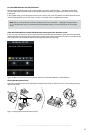
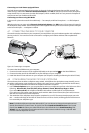
3. Open the panel on the front-right of the Jabra PRO base by slipping your fingernail under the bottom edge of
the panel and pulling forward and up. This reveals the clear dial-tone switch. It is labelled with the letters A to G.
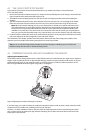
4. Press the headset button on your desk phone (or lift the handset from your desk phone).
This connects your desk phone to the phone network.
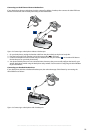
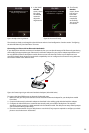
5. The wizard prompts you to select a position (A – F) manually on the base’s clear dial-tone switch.
Listen for a dial tone in your headset at each position. Find the setting where the dial tone is strong, clear and
undistorted.
6. Press the headset button on your desk phone (or hang up the handset) to disconnect from the phone
network.
7. Set the microphone level, as described in the section below.