


ADDENDUM TO ISSUE 4 OF THE AXXESS MANUAL OCTOBER 1997
Page 19 of 73
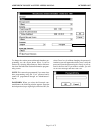
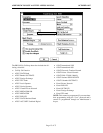
(4) Choose the Avdap service account from the
Names list. Select the Add button to add this
name.
(5) Select OK to exit to the Local Group Properties
window.
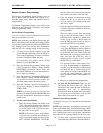
(6) Select “User Rights” from the Policies drop-
down menu.
(7) Check the box in the lower left corner to “Show
Advanced User Rights.”
(8) Select “Log on as a batch job” from the Right
drop-down list, then select the Add command
button.
(9) Choose the Avdap account from the “Names”
list and select the Add command button. Then
select OK.
(10) Select OK to exit the User Rights window.
(11) Exit the User Manager program.
There are two ways you can start the Avdap service
manually:
•
Open Services inside the Control Panel. Select the
“Avdap” service and select the Start button.
•
Open a command shell, then type: net start avdap
There are three ways you can shut down the Avdap ser-
vice manually:
•
From the avdapmon window (see next section),
type ~ (tilde).
•
Open Services inside the Control Panel. Select the
“Avdap” service and select the Stop button.
•
Open a command shell, then type: net stop avdap
AvdapMon Utility: Because the AXXESSORY Talk
software is running as a service, it does not have a con-
sole for displaying output. Inter-Tel provides a stand
alone program called “AvdapMon” that can be used for
viewing the AXXESSORY Talk software messages.
The setup program automatically creates a shortcut to
Avdapmon in the AXXESSORY Talk programming
group in the Programs folder.
Avdapmon uses a TCP/IP socket to connect to the
AXXESSORY Talk software. It can be run from the
AXXESSORY Talk PC itself or any other PC running
Windows NT or Windows 95, as long as there is a TCP/
IP network connection from the PC running the Avdap-
Mon utility to the AXXESSORY Talk PC. Note that the
software supports only one active AvdapMon connec-
tion.
This program has the following parameters:
avdapmon <IP number> <socket number>
The <IP number> is the IP number of the AXXESSO-
RY Talk PC in “dotted notation” (e.g. 190.253.11.210).
The <socket number> is the socket number of the Av-
dap service. If not configured differently, the default
socket number is 4444.
If the AvdapMon utility is run on the AXXESSORY
Talk PC itself, there is a shortcut notation to specify the
IP and port numbers. In this case, simply type avdap-
mon . . (that is: avdapmon followed by a space, a peri-
od, a space, and a period again).
To protect the AXXESSORY Talk against unautho-
rized access through AvdapMon, a password can be re-
quired to use the AvdapMon utility. This password is
set through Database Programming (see page 27).
Registry Information: AXXESSORY Talk 4.3 now
uses Windows NT Registry to store the command line
options. To modify values in the Registry, use the Win-
dows NT registry editor program called RE-
GEDT32.EXE.
CAUTION: This registry configuration is not a part of
the software configuration. It is included here for diag-
nostic and troubleshooting purposes only. Under nor-
mal circumstances, you should never need to access the
registry settings. This procedure should only be per-
formed by a trained installer; modifying the registry
values improperly can damage Windows NT configura-
tion and render it unusable.
To modify the Avdap parameter in the registry, follow
these steps:
(1) Run the registry editor program by typing
regedt32 from a command prompt or select the
Start button, select Run, and type regedt32 in
the Open line.
(2) Select the HKEY_LOCAL_MACHINE win-
dow and locate the subkey called “Software.”
Open the Software subkey.
(3) Locate and open the subkey called “Inter-Tel.”
(4) Locate and select the Avdap subkey.
(5) Inside this subkey is a value called “Parame-
ters.” The type of this value is REG_MUL-
TI_SZ. Edit the value.
(6) You will see a window called Multi-String Edi-
tor that permits you to add or remove the Avdap
command option. Note that each option has to
appear a separate line. To add a new option,
simply type it in on a new line. To remove an
option, delete its line.
(7) When finished, select the OK button.
(8) Exit the registry editor program. The registry
will be saved automatically.