


4600 Series IP Telephone Installation
22 4600 Series IP Telephone Installation Guide
Assembling the 4600 Series IP Telephone
!
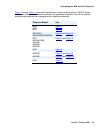
CAUTION:
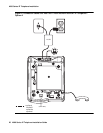
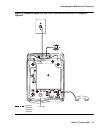
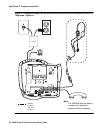
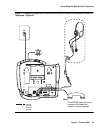
CAUTION: Be careful to use the correct jack when plugging in the telephone. The jacks are
located on the back of the telephone housing and are flanked by icons to
represent their correct use.
Powering the 4600 IP Telephone
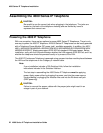
With one exception, there are two options to power 4600 Series IP Telephones. There is only
one way to power the 4630 IP Telephone. All 4600 Series IP Telephones can be locally powered
with a Telephone Power Module (DC power jack), available separately. In addition, the 4601/
4601+/4602/4602SW/4602SW+/4606/4610SW/4612/4620/4620SW/4621SW/4622SW/4624/
4625SW/4630SW IP Telephones support IEEE 802.3af-standard LAN-based power. Before
installation, verify with the LAN administrator whether the LAN supports IEEE 802.3af, and if so,
whether the telephone should be powered locally or by means of the LAN.
The 4690 IP Conference Telephone is powered using a power interface module placed between
the LAN and the telephone on the Category 5 network cable.
Note:
Note: If your installation includes a 30A Switched Hub, follow the installation
instructions included in the Switched Hub box.
The last step in assembling the 4600 Series IP Telephone must be applying
power. Apply power either by plugging the power cord into the power source
(local powering) or plugging the modular line cord into the Ethernet wall jack
(IEEE powering).
!
CAUTION:
CAUTION: Failure to connect the proper cables with the proper jacks might result in an
outage in part of your network.