


Getting Connected
User's Manual 7-5
TOSHIBA Pocket PC e740 Version
1
Last Saved on 10/05/2002 21:02
ENGLISH using Euro_C.dot –– Printed on 10/05/2002 as PDA3_UK
To start the connection, simply start using one of the following programs.
Your device will automatically begin connecting. Once connected, you
can:
■ Send and receive e-mail messages by using Inbox. Before you can
use Inbox, you need to provide the information it needs to
communicate with the e-mail server. For specific instructions, see
“Connect Directly to an E-mail Server,” later in this chapter.
■ Visit Internet or intranet Web or WAP pages by using Pocket Internet
Explorer.
■ Send and receive instant messages with MSN Messenger. For more
information, see “MSN Messenger” in Chapter 5.
■ Synchronize. For more information, see ActiveSync Help on the
computer.
To create an Ethernet connection to a network:
1 You do not need to create a new connection on your device. Instead,
you must purchase and configure an Ethernet card that is compatible
with your device.
2 Get the following information from your network administrator: user
name, password, and domain name.
3 Insert the Ethernet card into your device. For instructions on inserting
and using the Ethernet card, see the owner’s manual for the card.
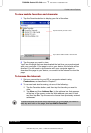
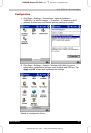
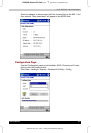
4 The first time you insert the card, Network Settings will appear
automatically so that you can configure the Ethernet card. Most
networks use DHCP, so you should not have to change these settings
unless your network administrator instructs you to do so. Tap OK. (If it
does not appear or to change settings later, tap and then Settings.
On the Connections tab, tap Network Adapters, tap the adaptor you
want to change, and then tap Network Adapters.)
5 Connect the Ethernet card to the network by using a network cable.
For information, see your owner's manual.
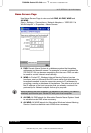
6 Tap
, Settings , Connections tab, and then Connections. From
the My network card connects to list, select Work.
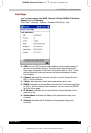
7 If you want to synchronize your device, tap
, and then ActiveSync.
In the Tools menu, tap Options. In the PC tab, select Include PC
when synchronizing remotely and connect to, and select your
computer's name. Remote synchronization with a computer will work
only if you have set up a partnership with that computer through
ActiveSync and have set ActiveSync to allow remote connections.
Other restrictions apply. For more information on synchronizing
remotely, see ActiveSync Help on the computer.
To start the connection, simply start using one of the programs listed in
the preceding section. Once connected, you can perform the same
activities as listed in the preceding section.