


9 - 26 Rev D Dolphin® 7900 Series User’s Guide
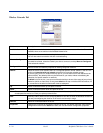
Adding a Wireless Network Configuration
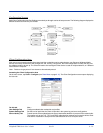
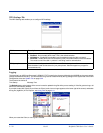
To add a wireless network configuration, on the main screen, tap and hold on the port, tap Configure on the Port popup menu,
then tap Add in the Network Configurations section of the Wireless Networks tab. The Network Profile screen opens displaying
the Profile Info tab.
Note: The settings on these tab windows are interrelated. This means that selecting one may disable access to others.
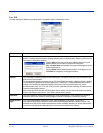
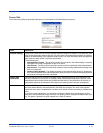
Profile Info Tab
Field Description
Network Profile Enter the name of this record. This is the name that appears in the Configured Networks list and, by
default, is the same as the broadcast SSID. Note that there is nothing special about the name "default".
You could configure any other record similarly and it would behave the same way.
Network Name This is the SSID of the AP. If the AP broadcasts its SSID, then this value may be derived from the Avail-
able Networks list. If the SSID does not broadcast, then you must manually enter the value here.
Peer-to-Peer
Group
Select this option to have two or more client workstations communicate with each other without the ben-
efit of an AP. You should also select Do Active Scan and, in the WEP Management page, enable Use
key for data encryption while entering a common key for both sides. WPA is not supported in this
mode.
Do active scan Select this option whenever the AP (or client, for ad hoc mode) is not broadcasting its SSID.
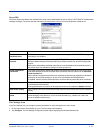
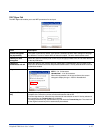
Authentication
Profile
Select the Client Configuration (user) profile associated with this network. The drop-down list contains
client profile names created in the User tab of the Client Configuration Area; see User Tab on page 9-
20.
To open the selected profile, select it in the drop-down list and tap View. The User tab opens displaying
the profile details. If you tap OK (to save changes) or Cancel, you are returned to the Profile Info tab.