


Chapter 1 Introducing Your Cisco IP Phone
Connecting Your Cisco IP Phone
1-2
Cisco IP Phone 7960 and 7940 Series User Guide
78-10182-08
Connecting Your Cisco IP Phone
Chances are, your system administrator or a technician will connect your new
Cisco IP Phone to the corporate IP telephony network. If that is not the case,
connecting your phone is easy.
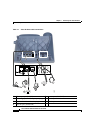
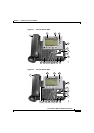
Follow the steps below. Refer to to locate ports on the back of your phone.
Before You Begin
Verify that your system administrator is ready for you to connect your
Cisco
IP Phone to the network.
Warning
Be sure to read Appendix B, “Safety Notices,” before connecting or using your
phone.
Step 1 Connect your Cisco IP Phone to the corporate IP telephony network. You can do
this in one of two ways, depending on how your workspace is set up. See your
system administrator if you are not sure which method to choose:
• Direct network connection—For this method, you need at least one available
Ethernet port in your workspace. Use the Ethernet cable included with your
phone to connect the network port on the back of your phone to the Ethernet
port in your workspace.
• Shared network connection—Use this method if you have a single Ethernet
port in your workspace with your desktop computer already connected to it.
First, disconnect the Ethernet cable from the computer and attach it to the
network port on the back of your phone. Next, use the Ethernet cable included
with your phone to connect the access port on the back of your phone to your
desktop computer. Your Cisco
IP Phone now shares a network connection
with your computer.
Step 2 Connect the handset to the handset port. Ensure that the end of the cord with the
longer uncoiled section is connected to the body of the phone.