


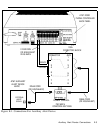


AT&T
Door Phone Controller
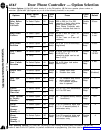
DIP Switch Settings
NOTE: All switches are OFF
The Door Phone Controller’s operating modes are selected on the
when shipped from the factory.
8-position DIP switch at the front of the unit. Positions 1 through 5 are
used to set up the way the Door Phone Controller will interface with
your telephone equipment. Position 8 is used to access Option Selec-
tion Mode. Positions 6 & 7 are not used. Definition are given below:
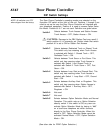
Switch 1
Selects between Trunk Access and Station Access.
Trunk Access
= OFF, Station Access = ON.
CAUTION: Damage to the PBX Station Card may result if
switch position #1 is incorrectly set. Double check that switch
position
Switch 2
Switch 3
Switch 4
Switch 5
Switch 6
Switch 7
Switch 8
#1 is set to ON for Station Port Access.
Selects between Dedicated Trunk or Shared Trunk.
This switch only has meaning when Trunk Access
is selected with Switch 1. Shared Trunk = OFF,
Dedicated Trunk = ON.
Selects between Trunk Savor or Port Saver. This
switch only has meaning when Trunk Access is
selected with Switch 1 and Shared Trunk is
selected with Switch 2. Trunk Saver = OFF, Port
Saver = ON.
Selects between Loop Start and Ground Start. This
switch only has meaning when Trunk Access is
selected with Switch 1. Loop Start = OFF, Ground
Start = ON.
Selects between Auxiliary Alert or Ringdown. This
switch only has meaning when Station Access is
selected with Switch 1. Auxiliary Alert = OFF,
Ringdown = ON.
Not used.
Not used.
Selects between Option Selection Mode and Normal
Operation. This switch acts as a Option Selection
security switch. If this switch is ON, any user can
activate Option Selection Mode by keying in “##3”
on a touch-tone telephone set which connects
directly to the Door Phone Controller. When this
switch is OFF, Option Selection Mode cannot be
activated. Normal Mode = OFF, Option Selection
Mode = ON.
(See other side for DTMF Option Selection.)