


1 2 3 4 5 6 7 8
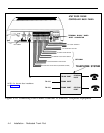
LEGEND
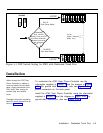
ON
Off On
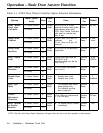
LOOP START
. . . The C.O.
(Trunk Saver Mode)
Immediately
after cut-thru
(Dialing Trunk) to AT&T
Door Phone Controller,
what do you want to
be connected
to...?
.
. . The DOOR
(Port Saver Mode)
1 2 3 4 5 6 7 8
ON
LOOP START
ON for
Option Selection
Mode Only
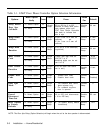
Figure 4-1. DIP Switch Setting for PBX with Dedicated Trunk Port
Installation
When moving the AT&T Door
Phone Controller or adding or
removing cables from the back
panel, unplug transformer from
120V outlet. Also unplug the
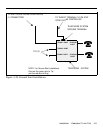
To customize the AT&T Door Phone Controller use the
information supplied in Section 2 and the diagram in Figure
4-2a. For ground start installations, also see Figure 4-2b.
phone connectors on the back panel.
terminal strip and modular
cords.
Install the AT&T Door Phone Controller using the information
supplied in Section 2 and the diagram in Figure 4-2a. For
Complete information regarding
ground start installations, also see Figure 4-2b.
each DIP switch position can be
found in Appendix A.
Installation - Dedicated Trunk Port 4-3