


Port Saver or Trunk Saver Mode Installation
Refer to the following instructions for Port Saver Mode or Trunk
Saver Mode installation.
Port Saver Mode
Follow the steps below to set the AT&T Door Phone Controller
for Port Saver Mode.
1.
2.
3.
Any or all options may be
4.
reselected in any order.
The Forced Disconnect
Time-out option does not apply
when setting options (unless 2
5.
minutes elapse without a
Touch-Tone selection).
CAUTION: Never connect an AT&T DOOR PHONE
CONTROLLER with the DIP Switches optioned for TRUNK
access to a STATION LINE! Doing so may cause damage
to the STATION LINE and/or the AT&T DOOR PHONE
CONTROLLER!
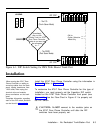
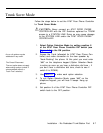
Select Option Selection Mode by setting position 8
of the AT&T Door Phone Controller DIP switch (see
Figure 1-1) to the ON position.
Access the trunk (allocated for the AT&T Door Phone
Controller), and make connection to the door speaker by
dialing “1” or “2” within 4 seconds. At this point you
must enter “##3” on the telephone keypad (Option
Selection Mode is active as soon as you hear a distinc-
tive dial tone – if you don’t hear a distinctive dial tone,
check to see if switch 8 is DOWN).
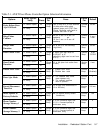
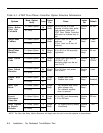
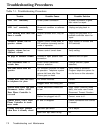
Use Table 6-1 to make each option selection.
To exit Option Selection Mode, press “##3” on the
telephone keypad. You will hear 2 beeps. Hang up
phone.
Set position 8 of the AT&T Door Phone Controller DIP
switch back to the OFF position.
6-6 Installation - No Dedicated Trunk/Station Port