


Installation
Mounting Instructions
The AT&T Door Phone Controller can be placed on a flat table
or shelf, or mounted to a wall.
Wall Mount Instructions
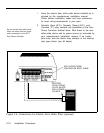
When moving AT&T Door
Phone Controller or adding/
removing cables from back
panel, unplug transformer from
120V outlet.
Also unplug the terminal strip
and modular phone connectors
on the back panel.
The AT&T Door Phone Controller is shipped with a keyhole
mounting template and mounting screws. Follow the steps
below to mount the Door Phone Controller to a wall.
1.
Place template (tear-out page at end of manual) over
desired wall mounting location and mark screw positions.
2. Use a Philips screwdriver to screw each of the two
screws into the marked screw positions.
IMPORTANT: Do not drive screws all the way into
wall; adequate space (5/16'') must be left to position
the AT&T Door Phone Controller bottom panel
keyholes over screw heads.
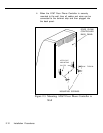
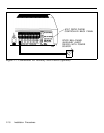
3. Mount the AT&T Door Phone Controller over the protrud-
ing screw heads and seat unit firmly to the wall. See
Figure 2-3.
WARNING: RISK OF ELECTRICAL SHOCK —
EQUIPMENT MUST BE PROPERLY GROUNDED.
Your AT&T equipment requires a properly grounded
three-prong power receptacle for safe operation. Have
the receptacle checked by a qualified electrician before
connecting this equipment. Do not cut or remove the
third (ground) prong from the power transformer. Do
not use two-prong extension cords or adapters to
defeat the safety features of this equipment. If you
have a two-prong receptacle, it must be replaced with
a three-prong receptacle, installed by a qualified
electrician.
Installation Procedures 2-11