


Where to Go Next
FastHub 400 10/100 Series Installation and Configuration Guide
2-26
Where to Go Next
Now that you have installed the hub and, if you have a FastHub 400M models, assigned IP
information to the hub, you can continue to
• Chapter 3, “Configuring and Monitoring from the Hub Manager” for configuration and
monitoring information. (FastHub 400M models only).
• Appendix C, “FastHub Stacks” for interconnecting the hub to other FastHub 400M
models to form hub stacks.
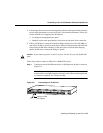
• Appendix D, “Switched Uplink Modules” for descriptions of the optional switched
uplink modules and procedures for installing and connecting to them.
Table 2-1 RMON Groups and Their Functions
Group Name Description
Statistics This group collects traffic and error statistics for a specific interface. For
example, you could use this group to determine how many error packets have
been seen on a given port.
Statistics from this group can be used by the history group to record historical
views of network performance. A statistics row is established by default for
each hub port.
History This group periodically samples the counters generated by the statistics
group. This information can be used to establish baseline information
regarding network activity. You can define the intervals you want to record
information for, and you can define how many of the samples are to be stored.
Note RMON statistics gathering has a maximum limit of 50 history buckets
per historyControlTable entry.
Alarm This group generates alarms according to user-defined thresholds. You could,
for example, configure RMON to generate an alarm when alignment errors on
a port exceeded a predefined limit. Rising and falling thresholds can be
defined, and the events group can generate traps and automated responses
based on the alarms.
Event This group sends traps to the management station based on information
(alarms) received from the alarm group.