


Installing Your Phone
Verifying Phone Startup
Cisco Small Business IP Phone SPA9XX User Guide 21
2
To connect your phone to the Cisco WBP54G:
STEP 1 Configure the Cisco WBP54G using the Setup Wizard. See the instructions in the
Wireless-G Bridge for Phone Adapters Quick Installation Guide
, available at
www.cisco.com/go/smallbiz.
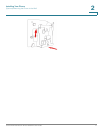
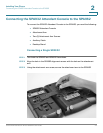
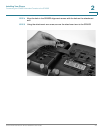
STEP 2 During the Setup Wizard process, connect the Ethernet network cable of the
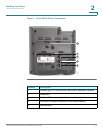
WBP54G to the back of the IP phone base station into the slot marked “WAN.” This
port is labeled #4 on the Cisco SPA IP Phone Connections graphic.
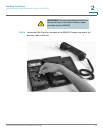
Connect the power cable of the WBP54G to the power port on the IP phone base.
See the Cisco SPA IP Phone Connections graphic, item #2.
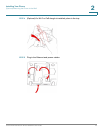
STEP 3 Plug the Cisco SPA9000 Voice System IP Phone power adapter into the power
port of the WBP54G.
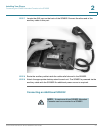
STEP 4 Plug the other end of the Cisco SPA 9000 Voice System IP Phone power adapter
into an electrical outlet.
Verifying Phone Startup
After receiving power and network connectivity, the phone executes a boot-up
sequence. During this sequence, the display will first show Cisco® and then
“Initializing Network”. All of the lights on the phone will flash. After the sequence,
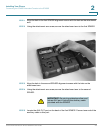
which should take about five seconds, the phone will display the standard menu
for the phone. The date, name and number of the phone will display on the top line
of the LCD screen. At the bottom of the LCD screen, softkeys are displayed over
their associated soft buttons.
If the phone does not provide this screen, confirm your installation and
connections. If these are correct, try unplugging the phone and plugging it back in
again. If you still don’t see the display, then contact your Phone Administrator or
Internet Telephony Service Provider (ITSP).