3-5
Cisco Unified IP Phone 8941 and 8945 Administration Guide for Cisco Unified Communications Manager 8.5 (SCCP and SIP)
OL-20851-01
Chapter
Installing the Cisco Unified IP Phone
Installing the Cisco Unified IP Phone
You must connect the Cisco Unified IP Phone to the network and to a power source before using it. See
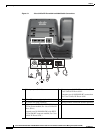
Figure 3-1 shows the connections for Cisco Unified IP phones 8941and 8945.
Note Before you install a phone, even if it is new, upgrade the phone to the current firmware image. Before
using external devices, read the
“Using External Devices” section on page 3-4 for safety and
performance information.
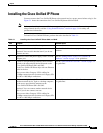
To install a Cisco Unified IP Phone, perform the tasks described in Table 3-1.
Table 3-1 Installing the Cisco Unified IP Phone 8941 and 8945
Task Purpose Related Topics
1. Connect the handset to the Handset port. —
2. Connect a headset to the Headset port.
Optional. You can add a headset later if you do not
connect one now.
See the “Headset” section on page 3-3 for supported
headsets.
3. Optional. Connect the power supply to the Cisco DC
Adapter port.
See the “Adding Phones to the Cisco Unified CM
Database” section on page 2-8 for guidelines.
4. Connect a straight-through Ethernet cable from the
switch to the network port labeled Network on the
Cisco Unified IP Phone 8941 and 8945.
Each Cisco Unified IP Phone ships with one Ethernet
cable in the box.
You can use either Category 3/5/5e cabling for
10-Mbps connections, but you must use Category 5/5e
for 100 or 1000 Mbps connections.
See the “Network and Access Ports” section on page 3-2
for guidelines.
5. Connect a straight-through Ethernet cable from
another network device, such as a desktop computer,
to the access port labeled Computer on the
Cisco Unified IP Phone 8941 and 8945.
Optional. You can connect another network device
later if you do not connect one now.
You can use either Category 3/5/5e cabling for
10-Mbps connections, but you must use Category 5/5e
for 100 or 1000 Mbps connections.
See the “Network and Access Ports” section on page 3-2
for guidelines.


