


5.2.7. Setting More Than One Phone as an Auto Attendant
You may wish to set more than one phone as an Auto Attendant to act as a back up for when your
primary Auto Attendant is busy. If you choose to have an additional Auto Attendant on your system,
then you must be sure to set your primary Auto Attendant with the shortest Auto Attendant Pickup
Delay. (5.2.5) This way it will always be the first one to answer calls. You must then set each
subsequent Auto Attendant with a different pickup delay to avoid more than one unit trying to pickup
an incoming call at the same time.
5.2.8. Using Additional Auto Attendant OGMs
In addition to the AA Day OGM, you may record up to an additional 7 Auto Attendant OGMs
numbered AA OGM2 through AA OGM8. The caller hears any of these messages by dialing the
corresponding number. You may record your hours of operation in AA OGM2 and directions to your
office to AA OGM3. In your prime AA OGM, you would say dial 2 for business hours and dial 3 for
travel directions to our office.
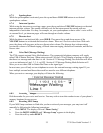
To record additional Auto Attendant OGM
a. Press MENU
b. Press DOWN ARROW repeatedly until “Answer Setting” appears in the display.
c. Press the soft key under ENTER. “Ans System: ON” will appear in the display.
d. Press DOWN ARROW repeatedly until “Advanced Setting” appears in display.
e. Press the soft key under ENTER. “AA OGM 2-8” will appear in display.
f. Press the soft key under ENTER. “AA OGM2” will appear in display
g. Lift handset and press RECORD button to start recording. The display will read “Confirm”
with options of NO (Down Arrow) or YES (Select Key). Press Yes, The unit will play a
message of “Please record a greeting after the tone.” Press STOP button to end greeting.
h. Press MENU to exit.
Note: Use the above directions to record additional OGMs.
5.2.9. Setting Separate Auto Attendant OGM's for Different Lines.
You may need to have a separate Auto Attendant OGM for one or more of your lines. While the phone
is preset to play the AA Day OGM on all lines, you may choose to have a different OGM on each line.
This feature is useful if you have multiple businesses sharing one system, or if your business and
personal lines sharing the same system.
In order to use this feature, first follow the instruction for recording additional Auto Attendant OGMs.
Then follow the steps below to assign the desired Auto Attendant OGM to each line.
a. Press MENU
b. Press DOWN ARROW repeatedly until “Answer Setting” appears in the display.
c. Press the soft key under ENTER. “Ans System: ON” will appear in the display.
d. Press DOWN ARROW repeatedly until “Advanced Setting” appears in display.
e. Press the soft key under ENTER.
f. Press DOWN ARROW until “AA by Line” appears in display.
g. Press the soft key under ENTER “L1 AA OGM1” will be on display
h. Press the soft key under CHANGE until the OGM is the one that you want answered on Line 1
i. Press DOWN ARROW to go to next Line or MENU to exit.
28 2750 User Guide Version 1.3