


Chapter 2 Getting Started with Your Cisco SIP IP Phone
Installing the Cisco SIP IP Phone
2-18
Cisco SIP IP Phone 7960 Administrator Guide
78-10497-02
Step 3
Connect a Category 3 or 5 straight-through Ethernet cable from another network
device, such as a desktop computer, to the access port on the phone (optional).
See “Connecting to the Network” section on page 1-13 for more information on
the access port.
Step 4
Connect the power plug to the Cisco AC Adapter port (optional).
See “Connecting to Power” section on page 1-14 for more information.
Adjusting the Placement of the Cisco SIP Phone
The Cisco SIP IP phone includes an adjustable footstand. When placing the phone
on a desktop surface, you can adjust the tilt height to several different angles in
7.5 degree increments from flat to 60 degrees. Alternatively, you can mount the
phone to the wall using the footstand or using the optional locking accessory.
Adjusting Phone Placement on the Desktop
Adjust the footstand to the height that provides optimum view of the display and
use of the buttons and keys.
To adjust the phone placement on the desktop:
Step 1
Push in the footstand adjustment knob.
Step 2
Adjust the footstand to its desired height and release the knob.
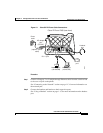
Mounting the Phone to the Wall
You can mount the Cisco SIP IP phone on the wall using the footstand as a
mounting bracket, or using the optional locking bracket. Use the following
procedure to mount the phone on the wall using the standard footstand. To use the
optional locking bracket, refer to the Installing the Wall Mount Kit for the Cisco
IP Phone document.